I recently spent some time going through the amazing nand2tetris course, and assignment #9 is to implement something with the Jack programming language that runs on the Hack computer. My friend encouraged me to try writing a raytracer, which is an algorithm that generates physically realistic images by simulating light bouncing off of objects. The output of the raytracer is a beautiful image with shadows, reflections, and other physical phenomena. Implementing a raytracer requires a bit of math and linear algebra, and it seemed like a fun challenge to write something complex with the limited capabilities of the Jack language.
I’d like to share my approach and the challenges I faced reimplementing my own math system and optimizing a Jack program with limited tools. Though you may never need to do this, you might learn a lot about how computers perform math, and gain an appreciation for math libraries!
First learnings
First, I looked at what the Jack language had to offer. I knew that debugging would be really challenging, so I was looking for how easy it would be to debug, print logging statements, and set breakpoints.
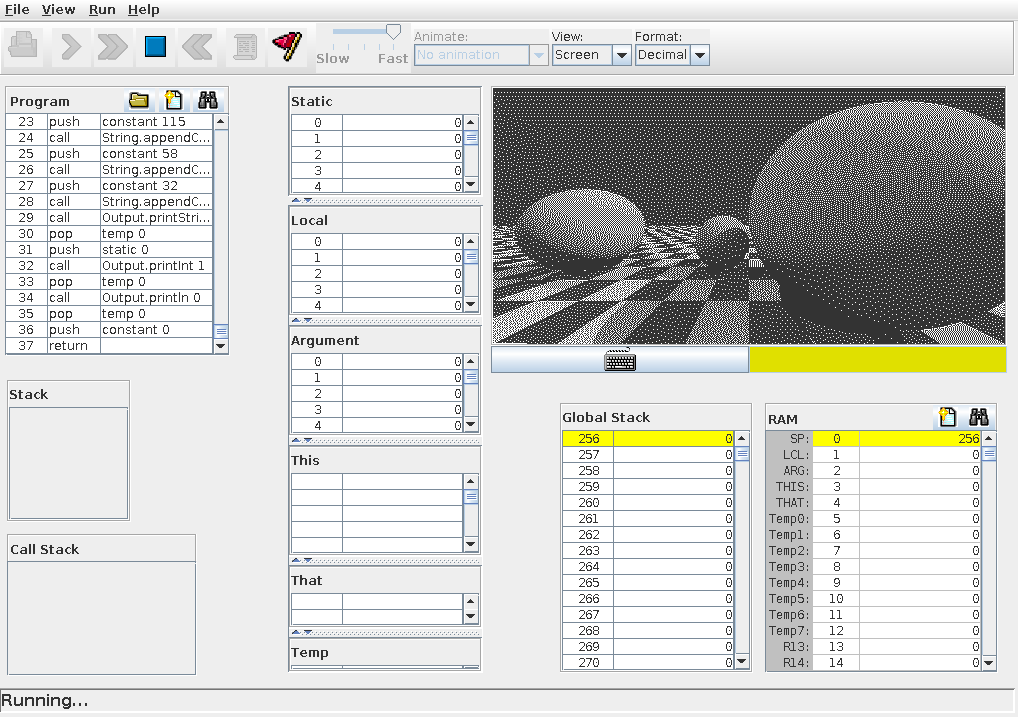
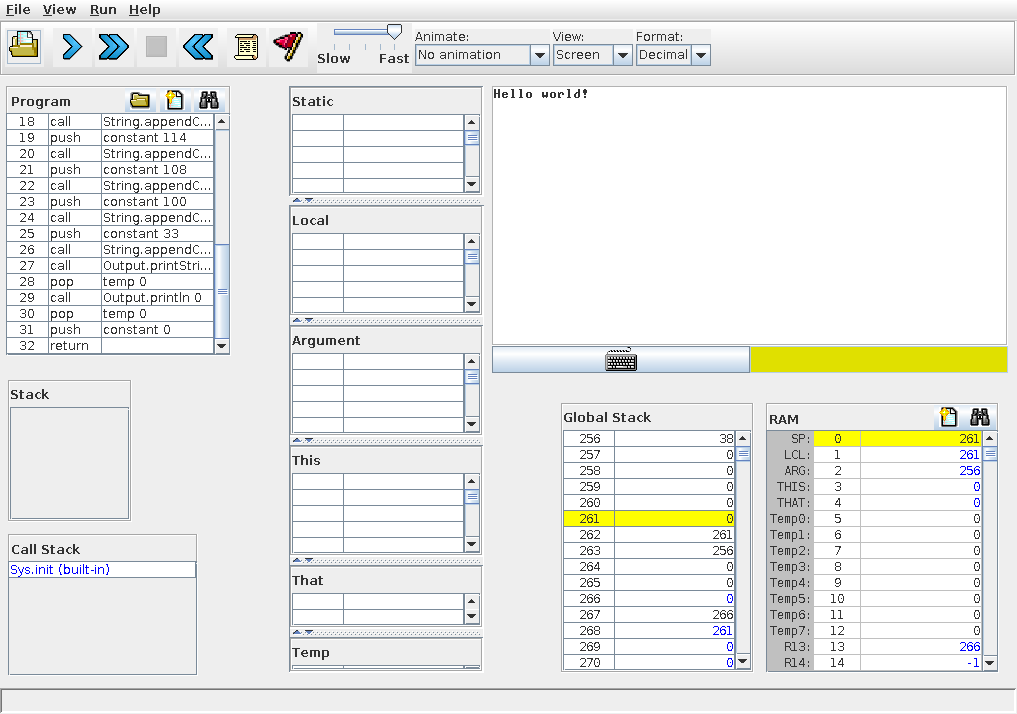
The answer was: not very easy. The system has a 512x256 black and white screen,
and when you use Output.printString to print stuff to it, it’s emitted onto
the screen, not to a separate terminal, and it doesn’t scroll very well. You can
set breakpoints, but it’s a little tricky to step into and out of functions. For
example, here’s printing “Hello world” to the screen.
This, along with performance concerns, led me to consider writing a test implementation of the raytracer, so that I could practice the implementation, iterate quickly, and get it working before translating it to Jack. I chose Rust for this because I’ve always wanted to learn Rust, and because it seemed like a good fit. Rust has precise control over copying semantics and int sizes, automatic memory management, immutability-first coding, and handy features like overflow detection for ints.
Using Rust
To write the Rust raytracer, I mostly followed this awesome blog post with some simplifications and modifications for the Hack computer. Since it has a 512x256 black and white screen (no grayscale), the output fidelity is pretty limited, so I chose not to implement the fancier stuff like reflections, since it wouldn’t be very visible anyways. Secondly, I only needed to do all color computations in a single channel, since I don’t have colors. Finally, I knew I’d need some sort of dithering algorithm to convert the grayscale output of the raytracer into black and white pixels in a nice-looking way.
You’d think I’d just be able to follow the tutorial, make these changes, render
a beautiful image, and start working on this blog post, but that wasn’t the
case. First, I had to solve an arguably even harder problem: the fact that Jack
has no decimal point type, only whole integers. Furthermore, the only number
type that Jack supports is a signed 16-bit integer (i16 in Rust), which stores
values from -32768 to 32767. This.. is not very big. Put it this way: you can
overflow this value by multiplying 200 by 200.
In order to implement a raytracer, you need a fairly complete math library,
including multiplication, division, square roots, and π. Jack has Math.sqrt,
but it only works on the native int type and truncates to the nearest int.
Of course, Rust has all the math functions I need, but it wouldn’t be a very good test implementation if I used Rust-specific functions. Therefore, I needed to use only the parts of Rust that exist in Jack, and implement the new parts myself in order to port them to Jack.
So, before writing a single line of raytracer code, I needed to write my own
numerical type that was big enough to support the range and precision I wanted.
I decided to break this into two steps: implementing a big enough Int class,
then implementing a decimal point type on top of it using
fixed-point arithmetic.
Fixed-point arithmetic
The idea behind fixed point arithmetic is that you can use some storage to store
data after the decimal point. Switching to standard base 10 for a second,
consider a scenario where I only have 5 digits for storage. I can either use it
to store 0 to 99999, or I could mentally insert a decimal point after the third
digit, which lets me store 0 to 999.99. In this case, I have three digits of
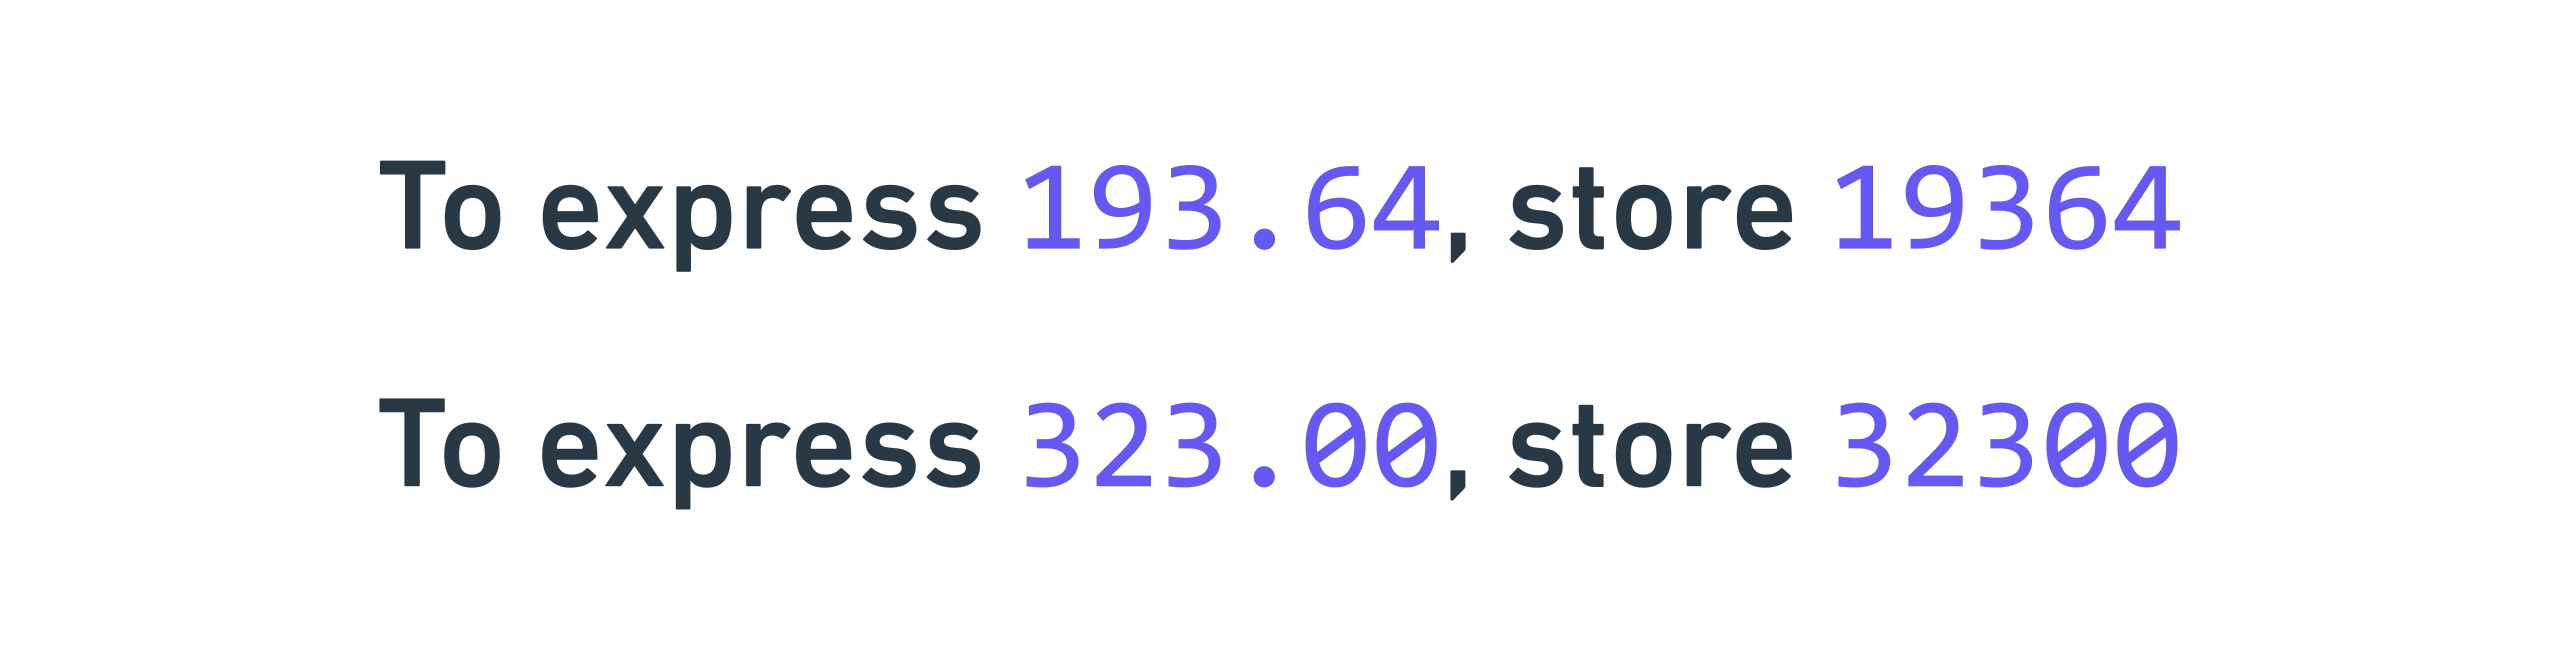
range and two digits of precision. To actually store the data, I multiply by
100, which is known as the scaling factor because you store X * 100 to
represent X: 34832 for 348.32, etc. When the scaling factor is 100, the
precision is 0.01, because your system’s smallest increment is in steps of 0.01,
and anything smaller is lost.
When the scaling factor is higher, you can store higher-precision decimals, but you lose overall range. For example, with a scaling factor of 1000, which means you store 34832 for 34.832, you now have three digits of decimals, but only two digits before the decimal point, so your range is now only 0‑99.
The overall idea idea is that you have to allocate your five digits to either storing pre- or post- decimal point digits, and it’s a tradeoff between range and precision. I’ll go into this more later!
Implementing a big enough Int class
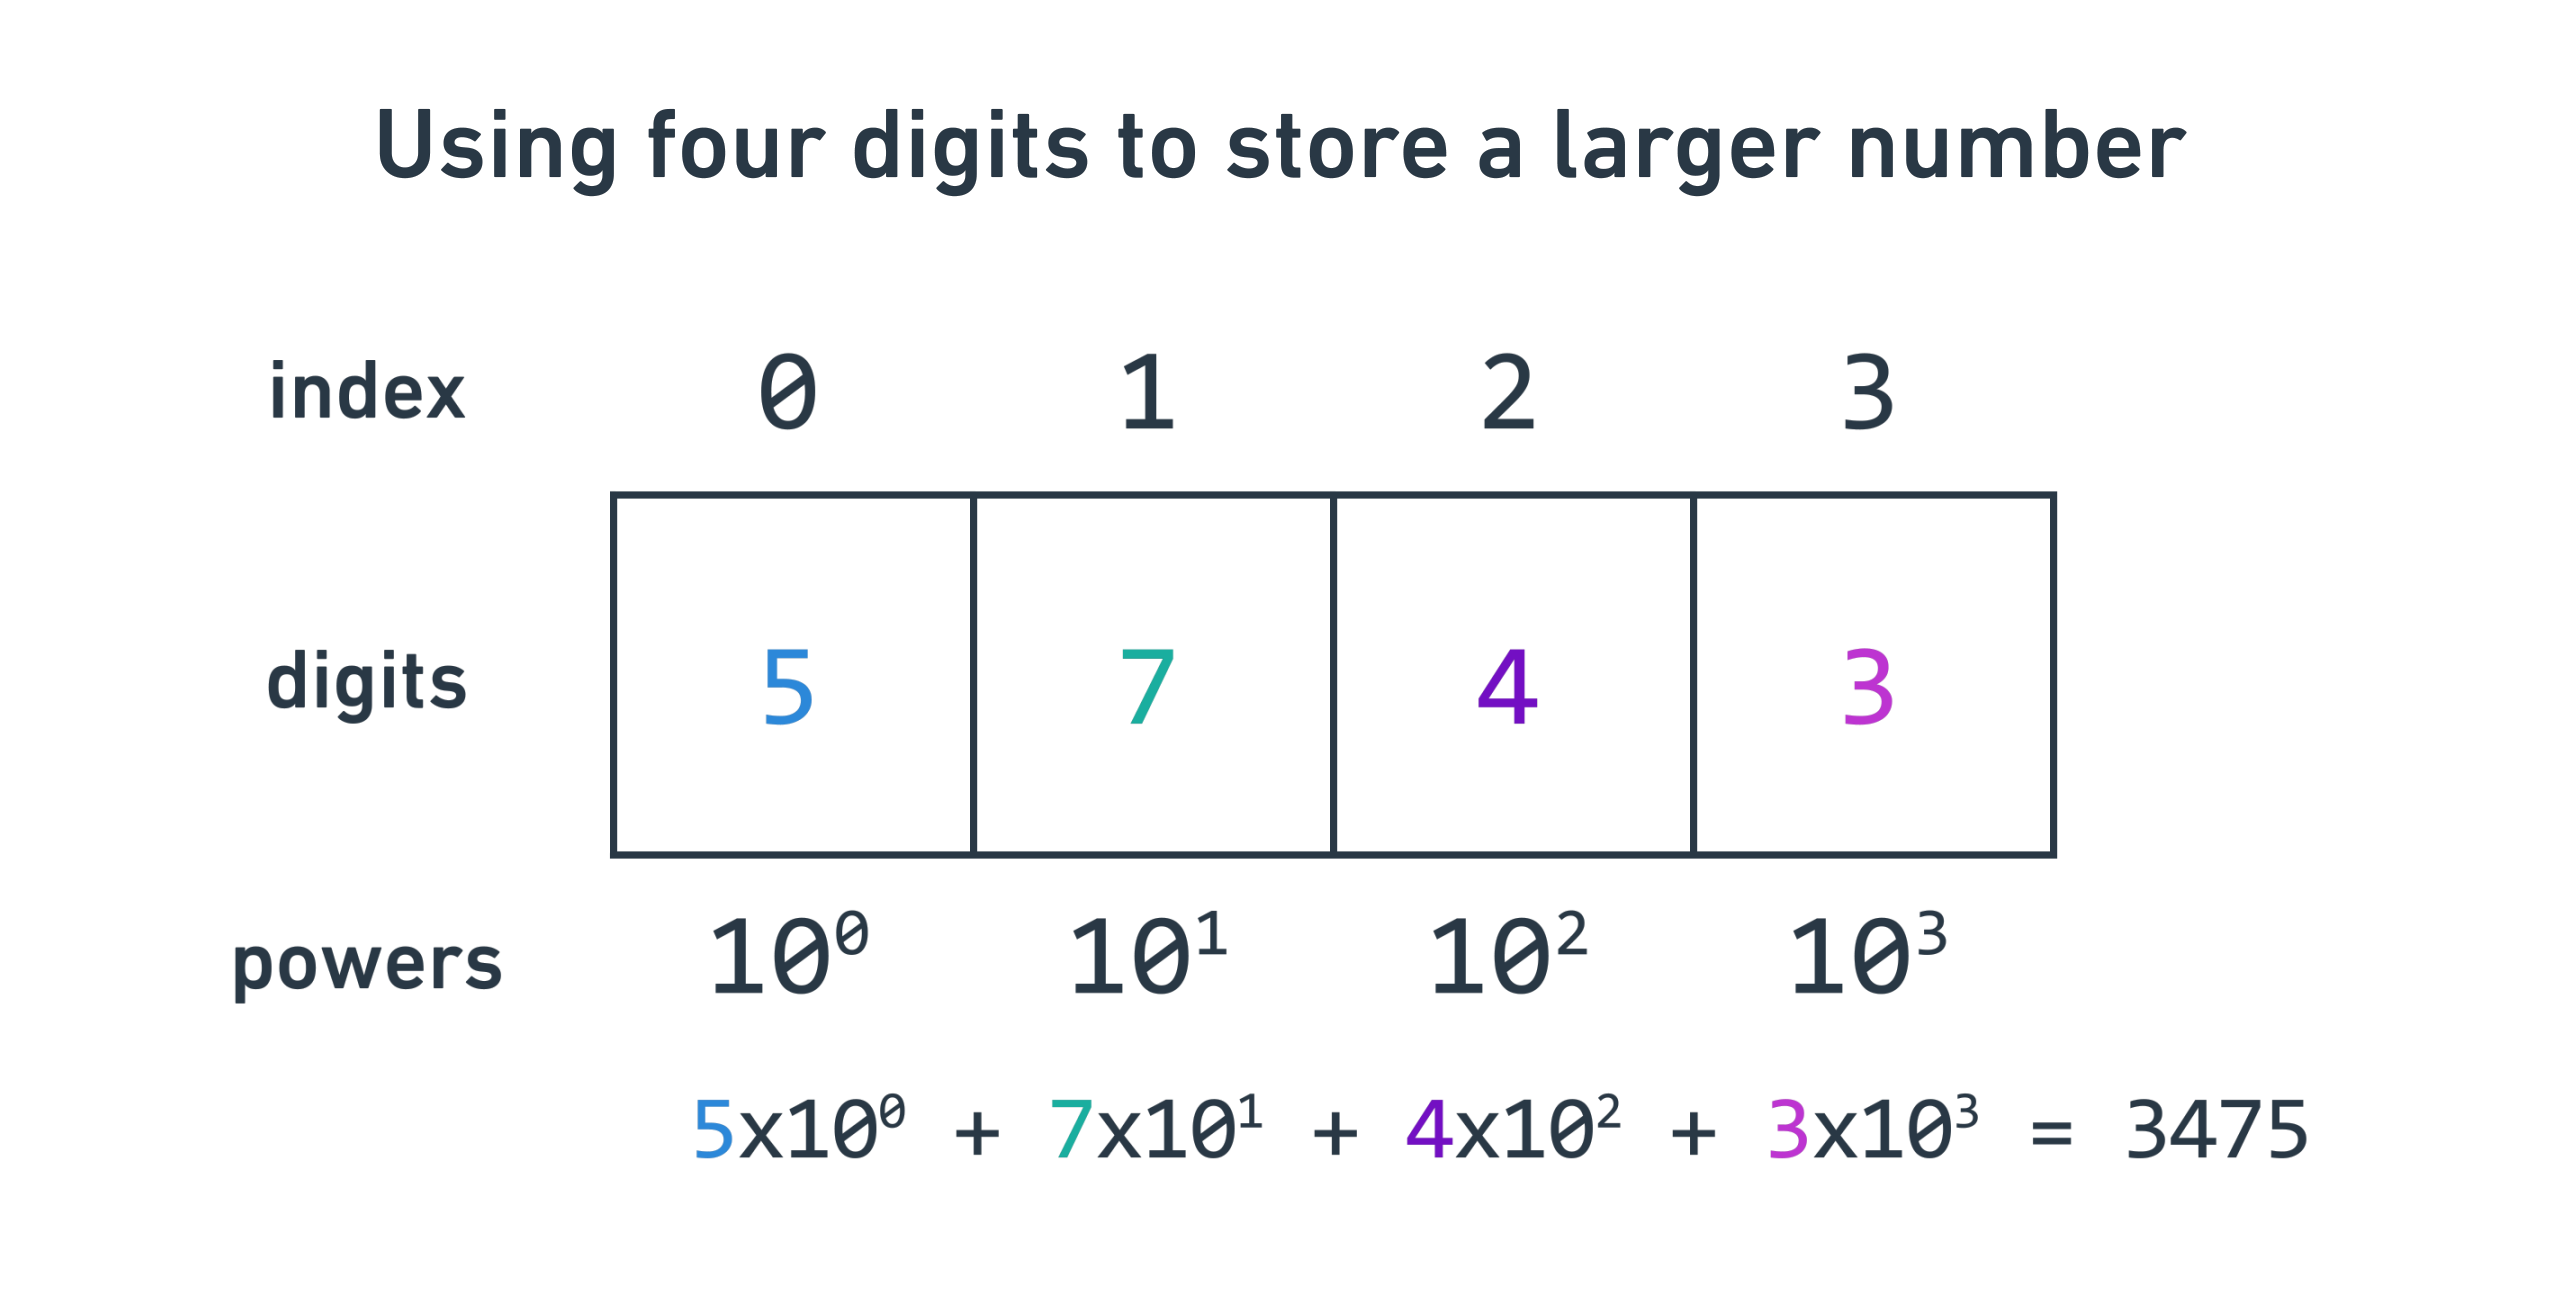
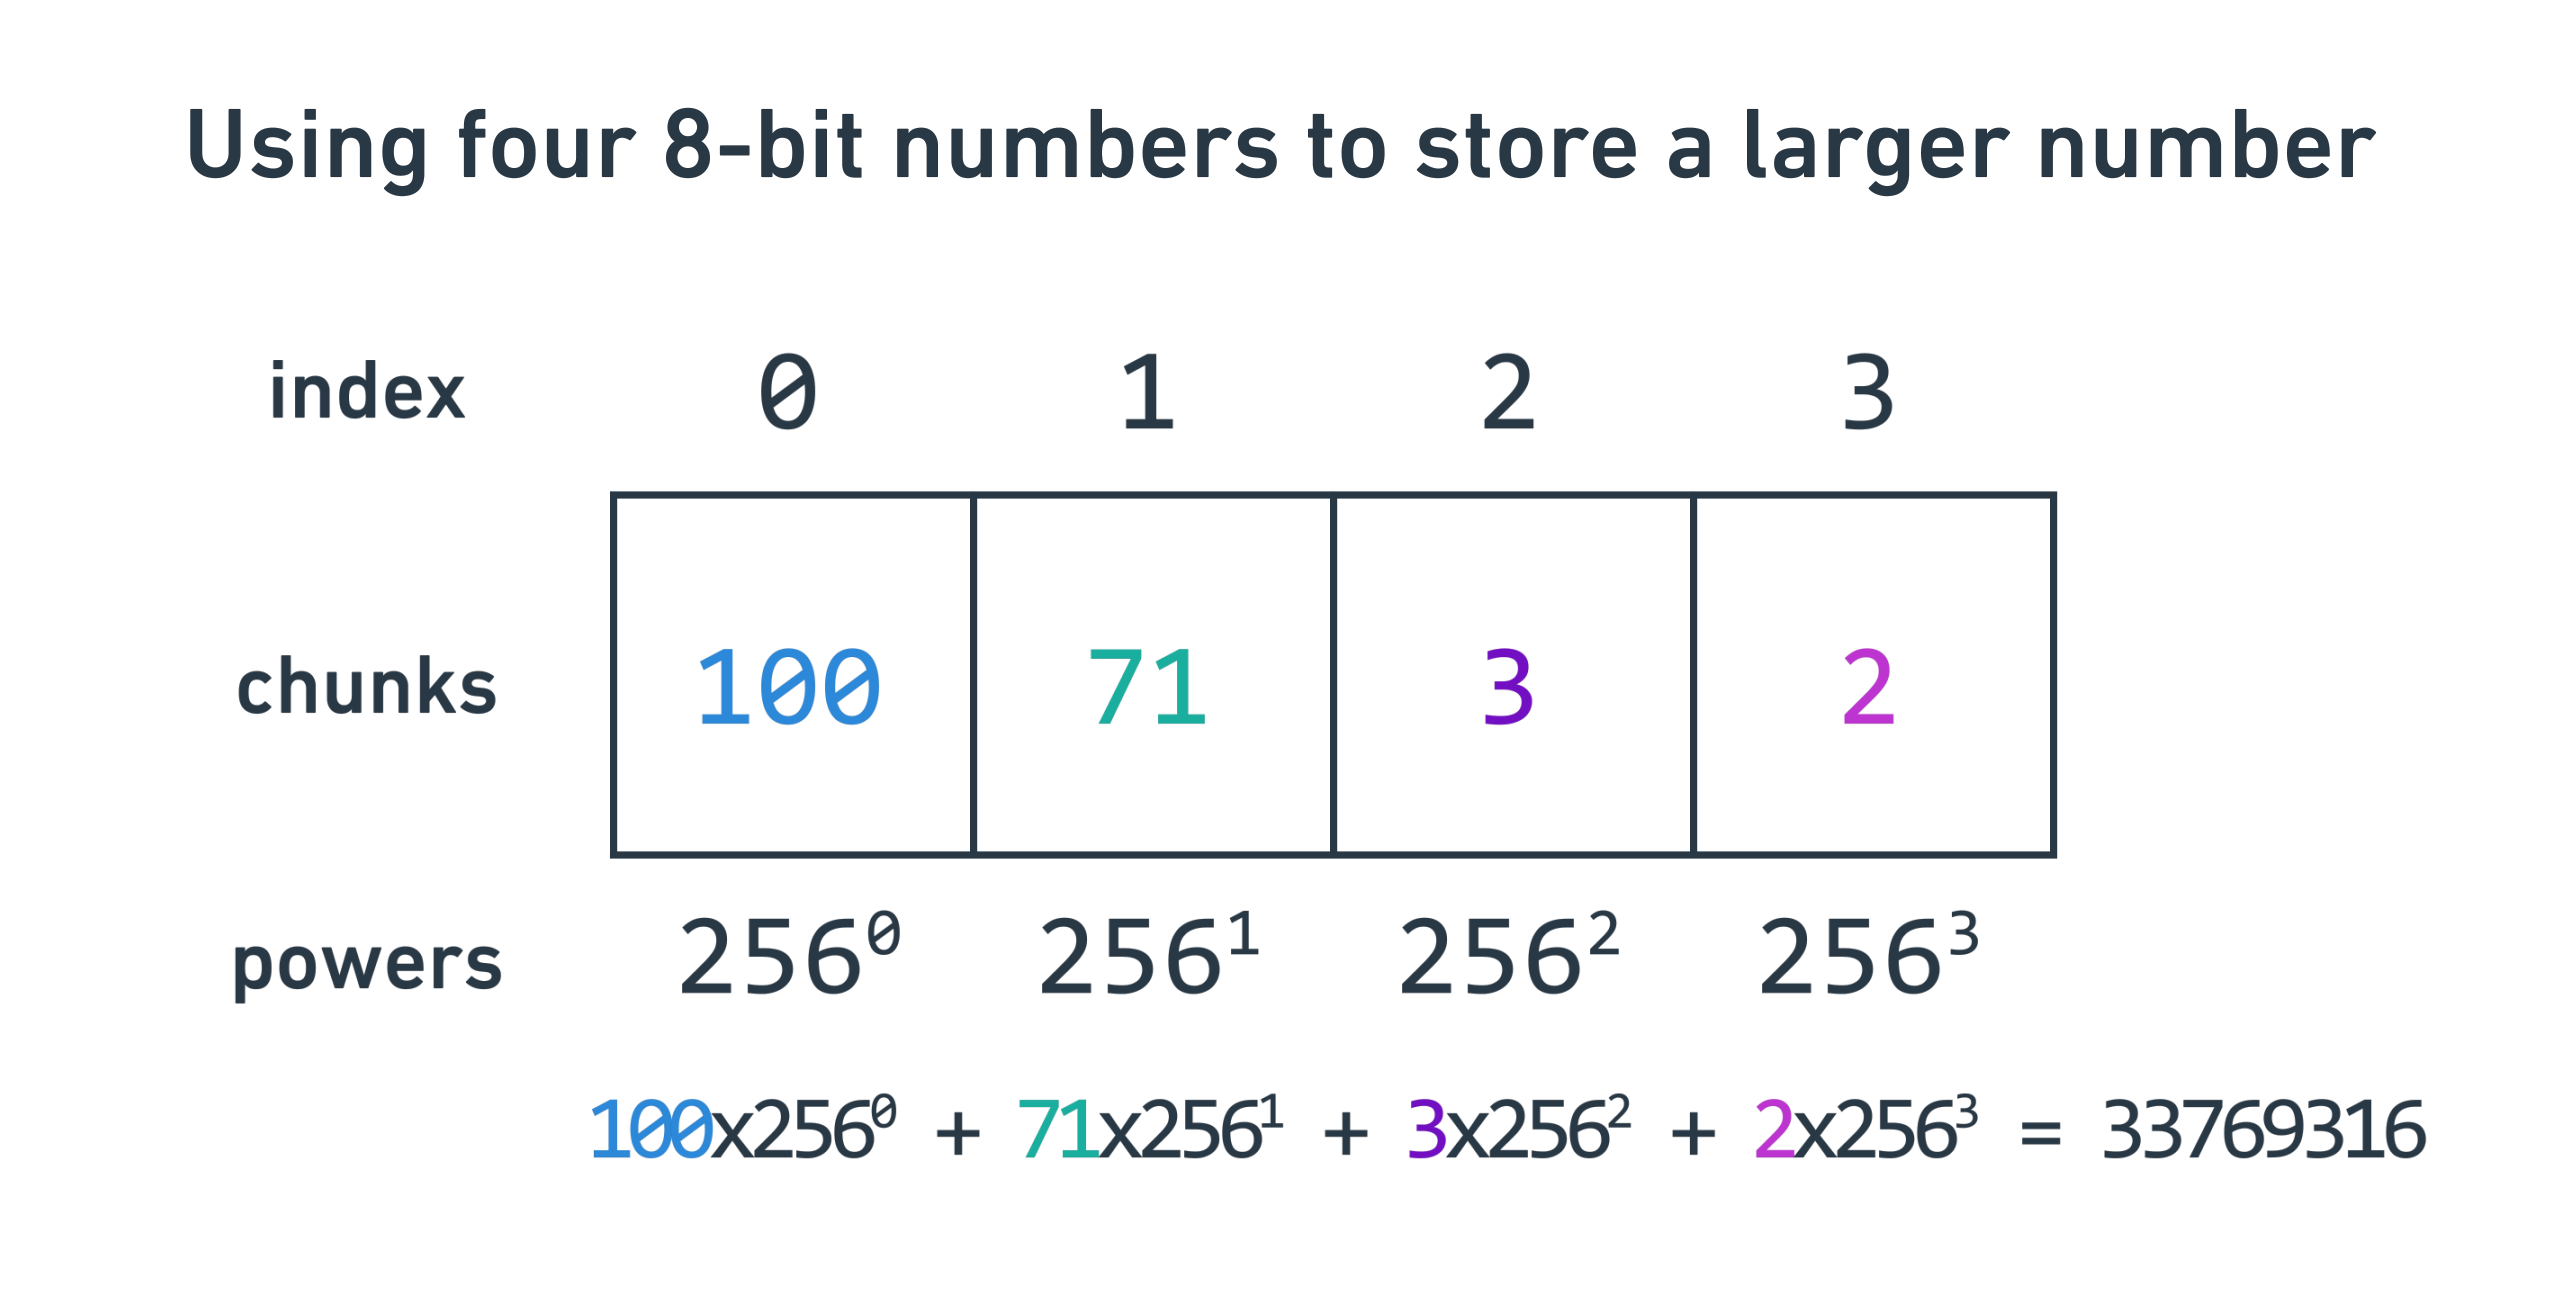
Returning to building the Int class, the main technique for doing this is to
store an array of integers. The first integer is the least significant chunk,
the next one is the next significant chunk, etc. It’s just like the way one uses
digits to express larger numbers.
In my Rust implementation, I use i16s (signed 16-bit integers) for every
integer, because I wanted to simulate the equivalent Jack type int.
Here’s what that looks like:
pub struct Int32 {
    pub parts: [i16; 4],
}
This is a struct with an array of four i16s. I called it Int32 because I
thought a signed 32-bit integer would be enough range to support all the math I
needed. It needs to support decimals in the future, and as mentioned above, I
need to allocate these 32 bits to store data either before or after the decimal
point. I’ll go into this more in the next section. For now, we only need to
concern ourselves for implementing math on this Int32 class.
You might notice that I seem to have more data than I need: an array of four
i16s is 64 bits of information, not 32. This is true. I deliberately left the
top eight bits of each i16 empty, which means that each i16 is in the range
of [0, 255]. I did this for a few reasons:
- I’ll need to use
i16math to implementInt32math, and it’s really helpful to have some room for overflow. For example, if I use the entirei16range, and eventually add 30000 to 5000, it will overflow and wrap around to -30534, which is not desirable. Instead, if I only use the “bottom” half of thei16, which stores 0 to 255, I can add 200 to 100 and get 300, then manually handle the overflow myself. - Jack has no unsigned integer, which makes the math troublesome. Most of the
algorithms that I’m about to use only work on unsigned integers. Rather than
trying to make them work with signed integers, I decided to artificially limit
the size to pretend I had an unsigned integer. In other words, I can use a
i16to pretend to be au8(unsigned 8-bit integer), because the range[0, 255]fits comfortably inside the range[-32768, 32767].
Assuming I don’t use the top eight bits of each i16, then each i16
contributes eight bits, and 8 * 4 = 32. Yay! Let’s start working on the math.
Implementing negation
Most systems store negative numbers using a technique called
two’s complement. If you have
an unsigned 3-bit integer, as you count from 000 to 111, the integers go
from 0 to 7. But for a signed 3-bit integer stored as two’s complement, as you
count from 000 to 111, the integers go from 0 to 3, then wrap around to -4,
then count up to -1. This slices the available range in half, but allows you to
store negative numbers!
| Binary | Unsigned | Signed |
|---|---|---|
| 000 | 0 | 0 |
| 001 | 1 | 1 |
| 010 | 2 | 2 |
| 011 | 3 | 3 |
| 100 | 4 | -4 |
| 101 | 5 | -3 |
| 110 | 6 | -2 |
| 111 | 7 | -1 |
This scheme sounds funky, but it has a few pros:
- Addition and subtraction “just work” with positive and negative numbers
without having to do anything special. For example,
2 (010) + -4 (100) = 110, which corresponds to -2. - It’s easy to see if a number is negative: check if the most significant bit (farthest to the left) is 1.
To implement negation in 2’s complement, flip all the bits and add one. Here’s what that looks like:
pub fn do_neg(&mut self) {
    // Flip each integer. We need to AND with 0xFF to get rid of all the
    // bits past the 8th bit, because those bits always need to be 0.
    self.parts[0] = !self.parts[0] & 0xFF;
    self.parts[1] = !self.parts[1] & 0xFF;
    self.parts[2] = !self.parts[2] & 0xFF;
    self.parts[3] = !self.parts[3] & 0xFF;

    // Add one, and handle carry.
    self.parts[0] += 1;

    if self.parts[0] >= 256 {
        self.parts[0] -= 256;
        self.parts[1] += 1;
    }

    if self.parts[1] >= 256 {
        self.parts[1] -= 256;
        self.parts[2] += 1;
    }

    if self.parts[2] >= 256 {
        self.parts[2] -= 256;
        self.parts[3] += 1;
    }

    if self.parts[3] >= 256 {
        self.parts[3] -= 256;
    }
}
You might notice I implemented this as a mutative function, rather than
returning a new Int32 with the negative result. This is a deliberate choice to
avoid extra allocations. By reusing the same struct, I don’t need to allocate
more memory for every math operation, and I’ll be using these a lot. This
might be penny-pinching in Rust, but it was an absolute lifesaver for Jack. I
also didn’t use Rust’s operator overloading, since Jack doesn’t have that
feature.
Implementing addition and subtraction
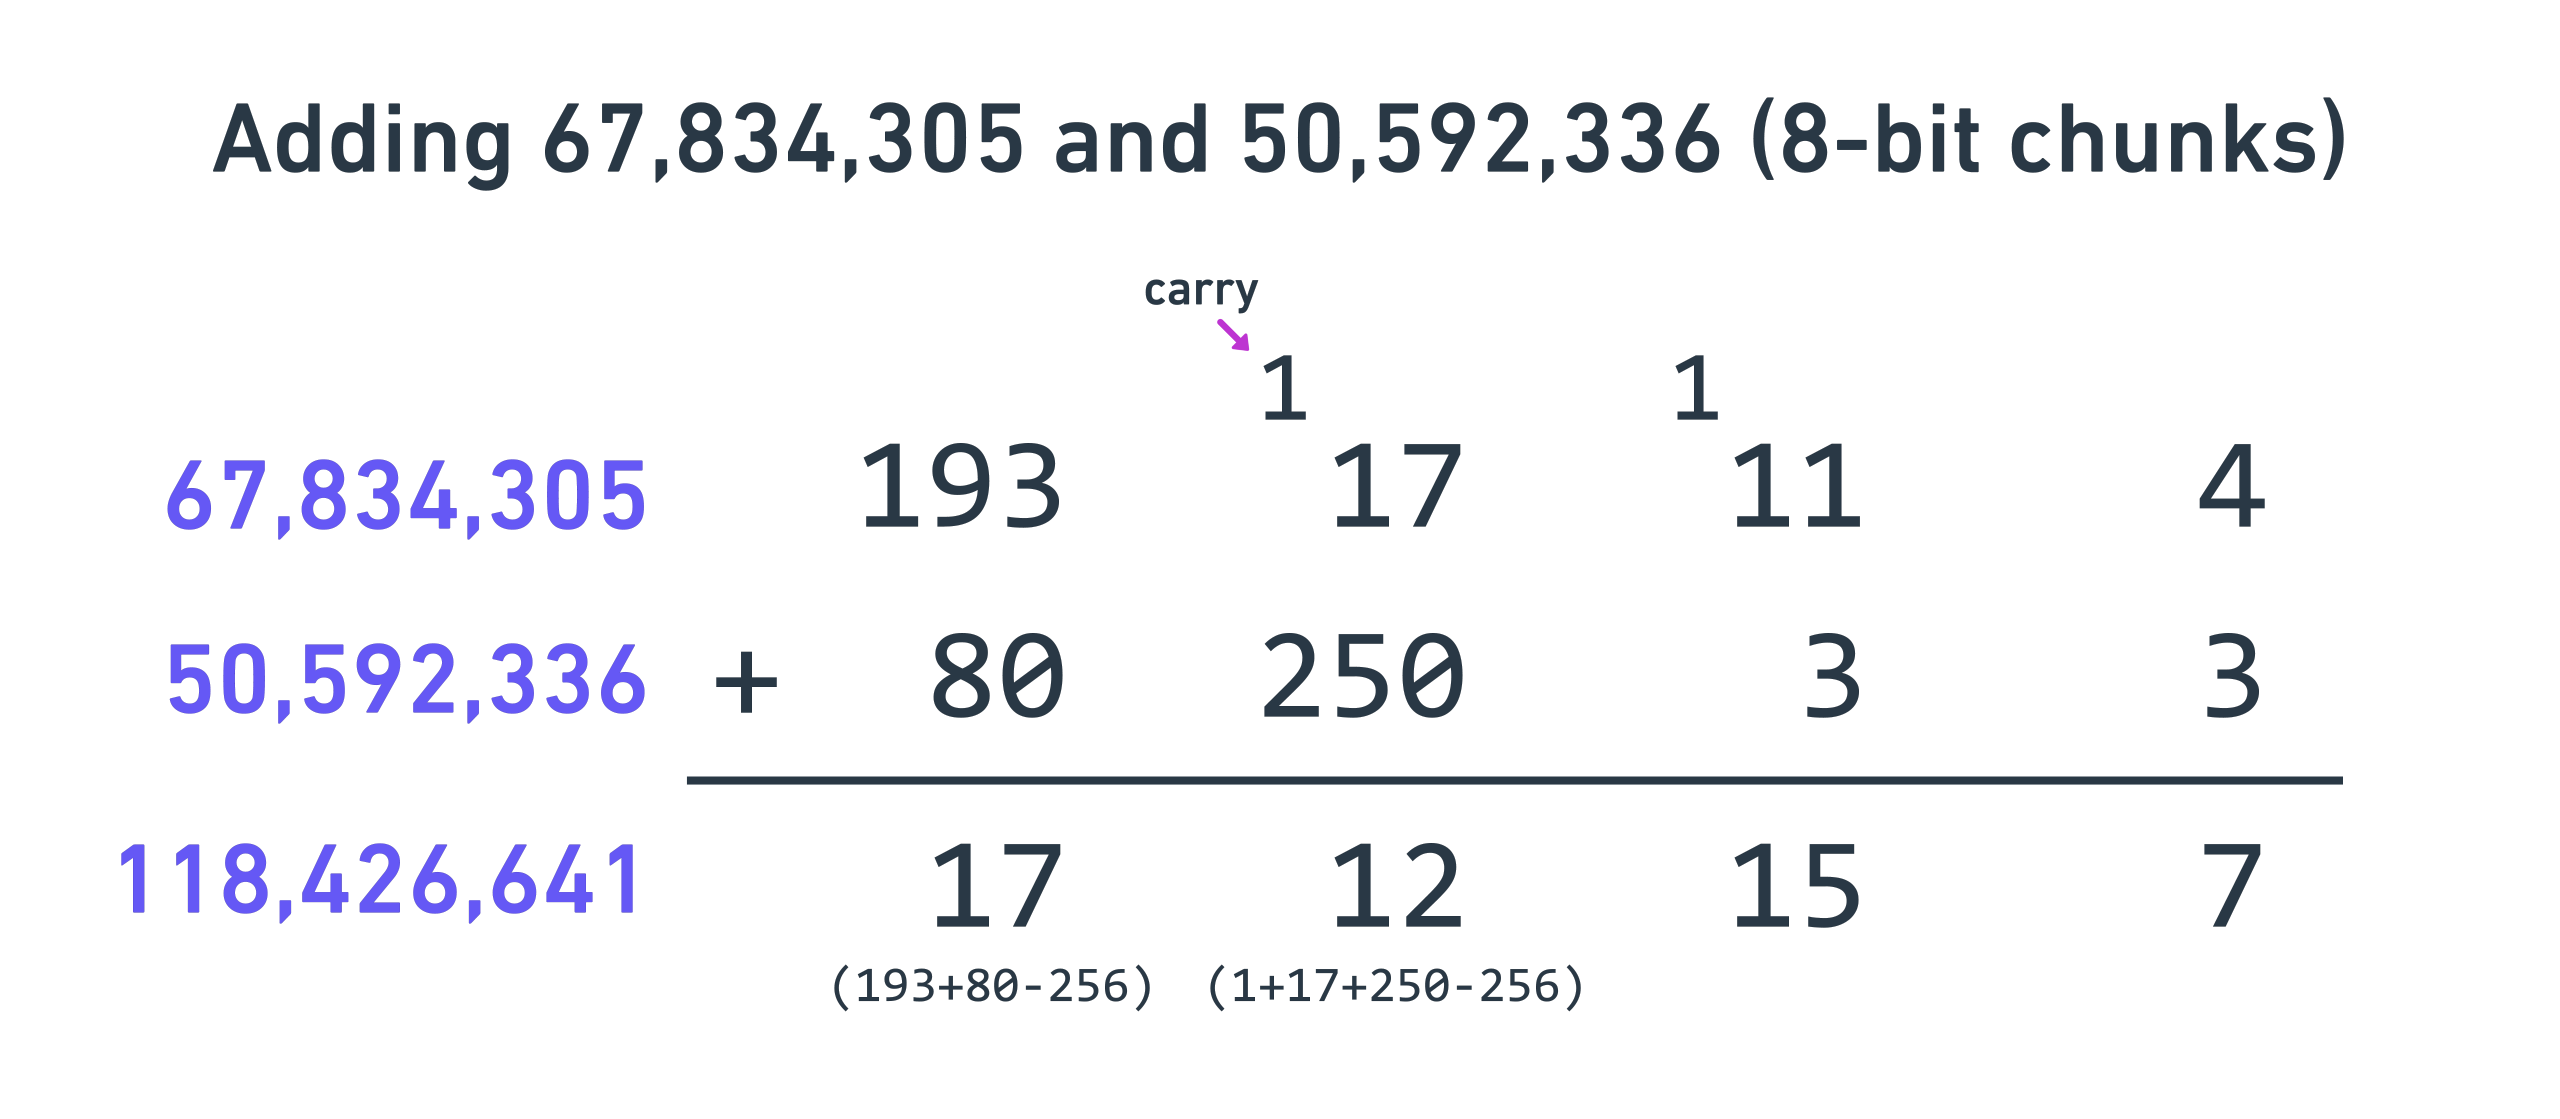
As mentioned above, addition and subtraction are fairly easy in a two’s complement world. Like school math, you add each component and carry over to the next higher chunk if needed.
pub fn do_add(&mut self, other: &Int32) {
    self.parts[0] += other.parts[0];
    self.parts[1] += other.parts[1];
    self.parts[2] += other.parts[2];
    self.parts[3] += other.parts[3];

    if self.parts[0] >= 256 {
        self.parts[0] -= 256;
        self.parts[1] += 1;
    }

    if self.parts[1] >= 256 {
        self.parts[1] -= 256;
        self.parts[2] += 1;
    }

    if self.parts[2] >= 256 {
        self.parts[2] -= 256;
        self.parts[3] += 1;
    }

    if self.parts[3] >= 256 {
        self.parts[3] -= 256;
    }
}
pub fn do_sub(&mut self, other: &Int32) {
    let mut neg = *other;
    neg.do_neg();
    self.do_add(&neg);
}
Remember that parts[0] is the least significant chunk and parts[3] is the
most significant. This is also an example of how having that extra space in the
i16 allows me to add two numbers in the [0, 255] range without fear of i16
overflow.
Implementing multiplication
Here’s where it got trickier. Multiplication can be done just like the school technique, where you multiply each pair of digits and offset accordingly.
I took the algorithm from this post and adapted it to Rust (and later Jack). However, I ran into two issues.
First, I only adapted the unsigned version of the algorithm for simplicity. That means I needed to handle signs myself. Luckily, this is not too bad:
- Take the absolute value of both sides.
- Perform an unsigned multiplication.
- If either side was negative (i.e. if
A is negative ^ B is negative = true), negate the result.
Secondly, I ran into integer sizing problems again during the implementation.
The original implementation multiplies unsigned shorts (or u16 in Rust), and
uses a temporary unsigned int (u32) to store the result. This is necessary,
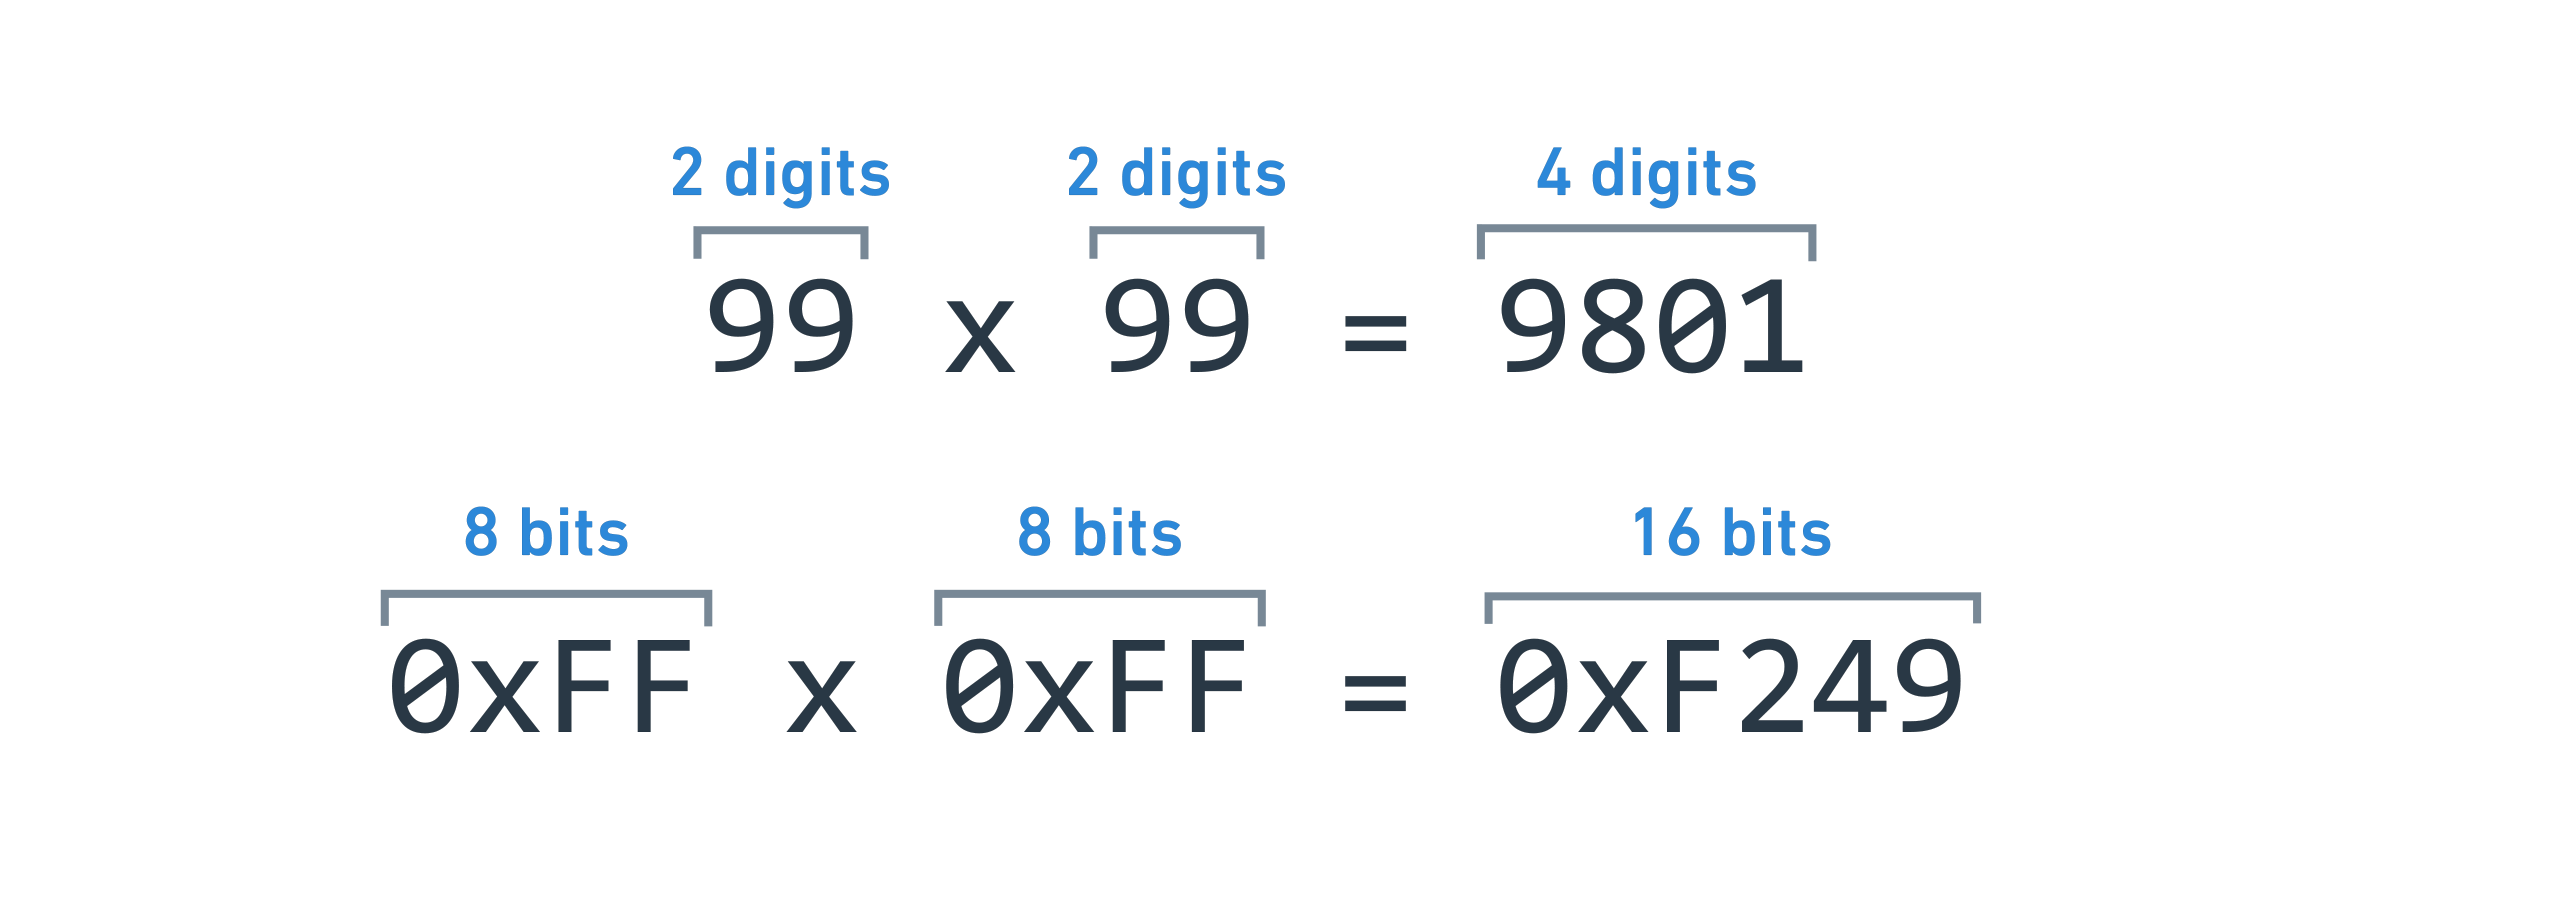
because multiplication is a range-expanding operation. For example, if you
multiply any two two-digit numbers, the result will be at most 4 digits. In the
same way, to properly fit the results of u16 * u16, you need a u32.
This is bad news for us because we only have one size, the i16. You might
think we could make this work because we secretly only use the bottom half, as
mentioned above. However, even that doesn’t work.
Since we’re using just the bottom half of the i16, it has a range of
[0, 255]. What happens when we multiply 255 by 255? We get 65,025, which
doesn’t fit in a i16 (range [-32768, 32767]). Sad times! This makes sense
because the [0, 255] range is represented by the type u8, and if you
multiply two u8s, you get a u16, which has the range [0, 65535]. All we
have is i16 (range [-32768, 32767]), which doesn’t fit :( This is a case
where having an unsigned integer type in Jack would really help, but alas, we do
not.
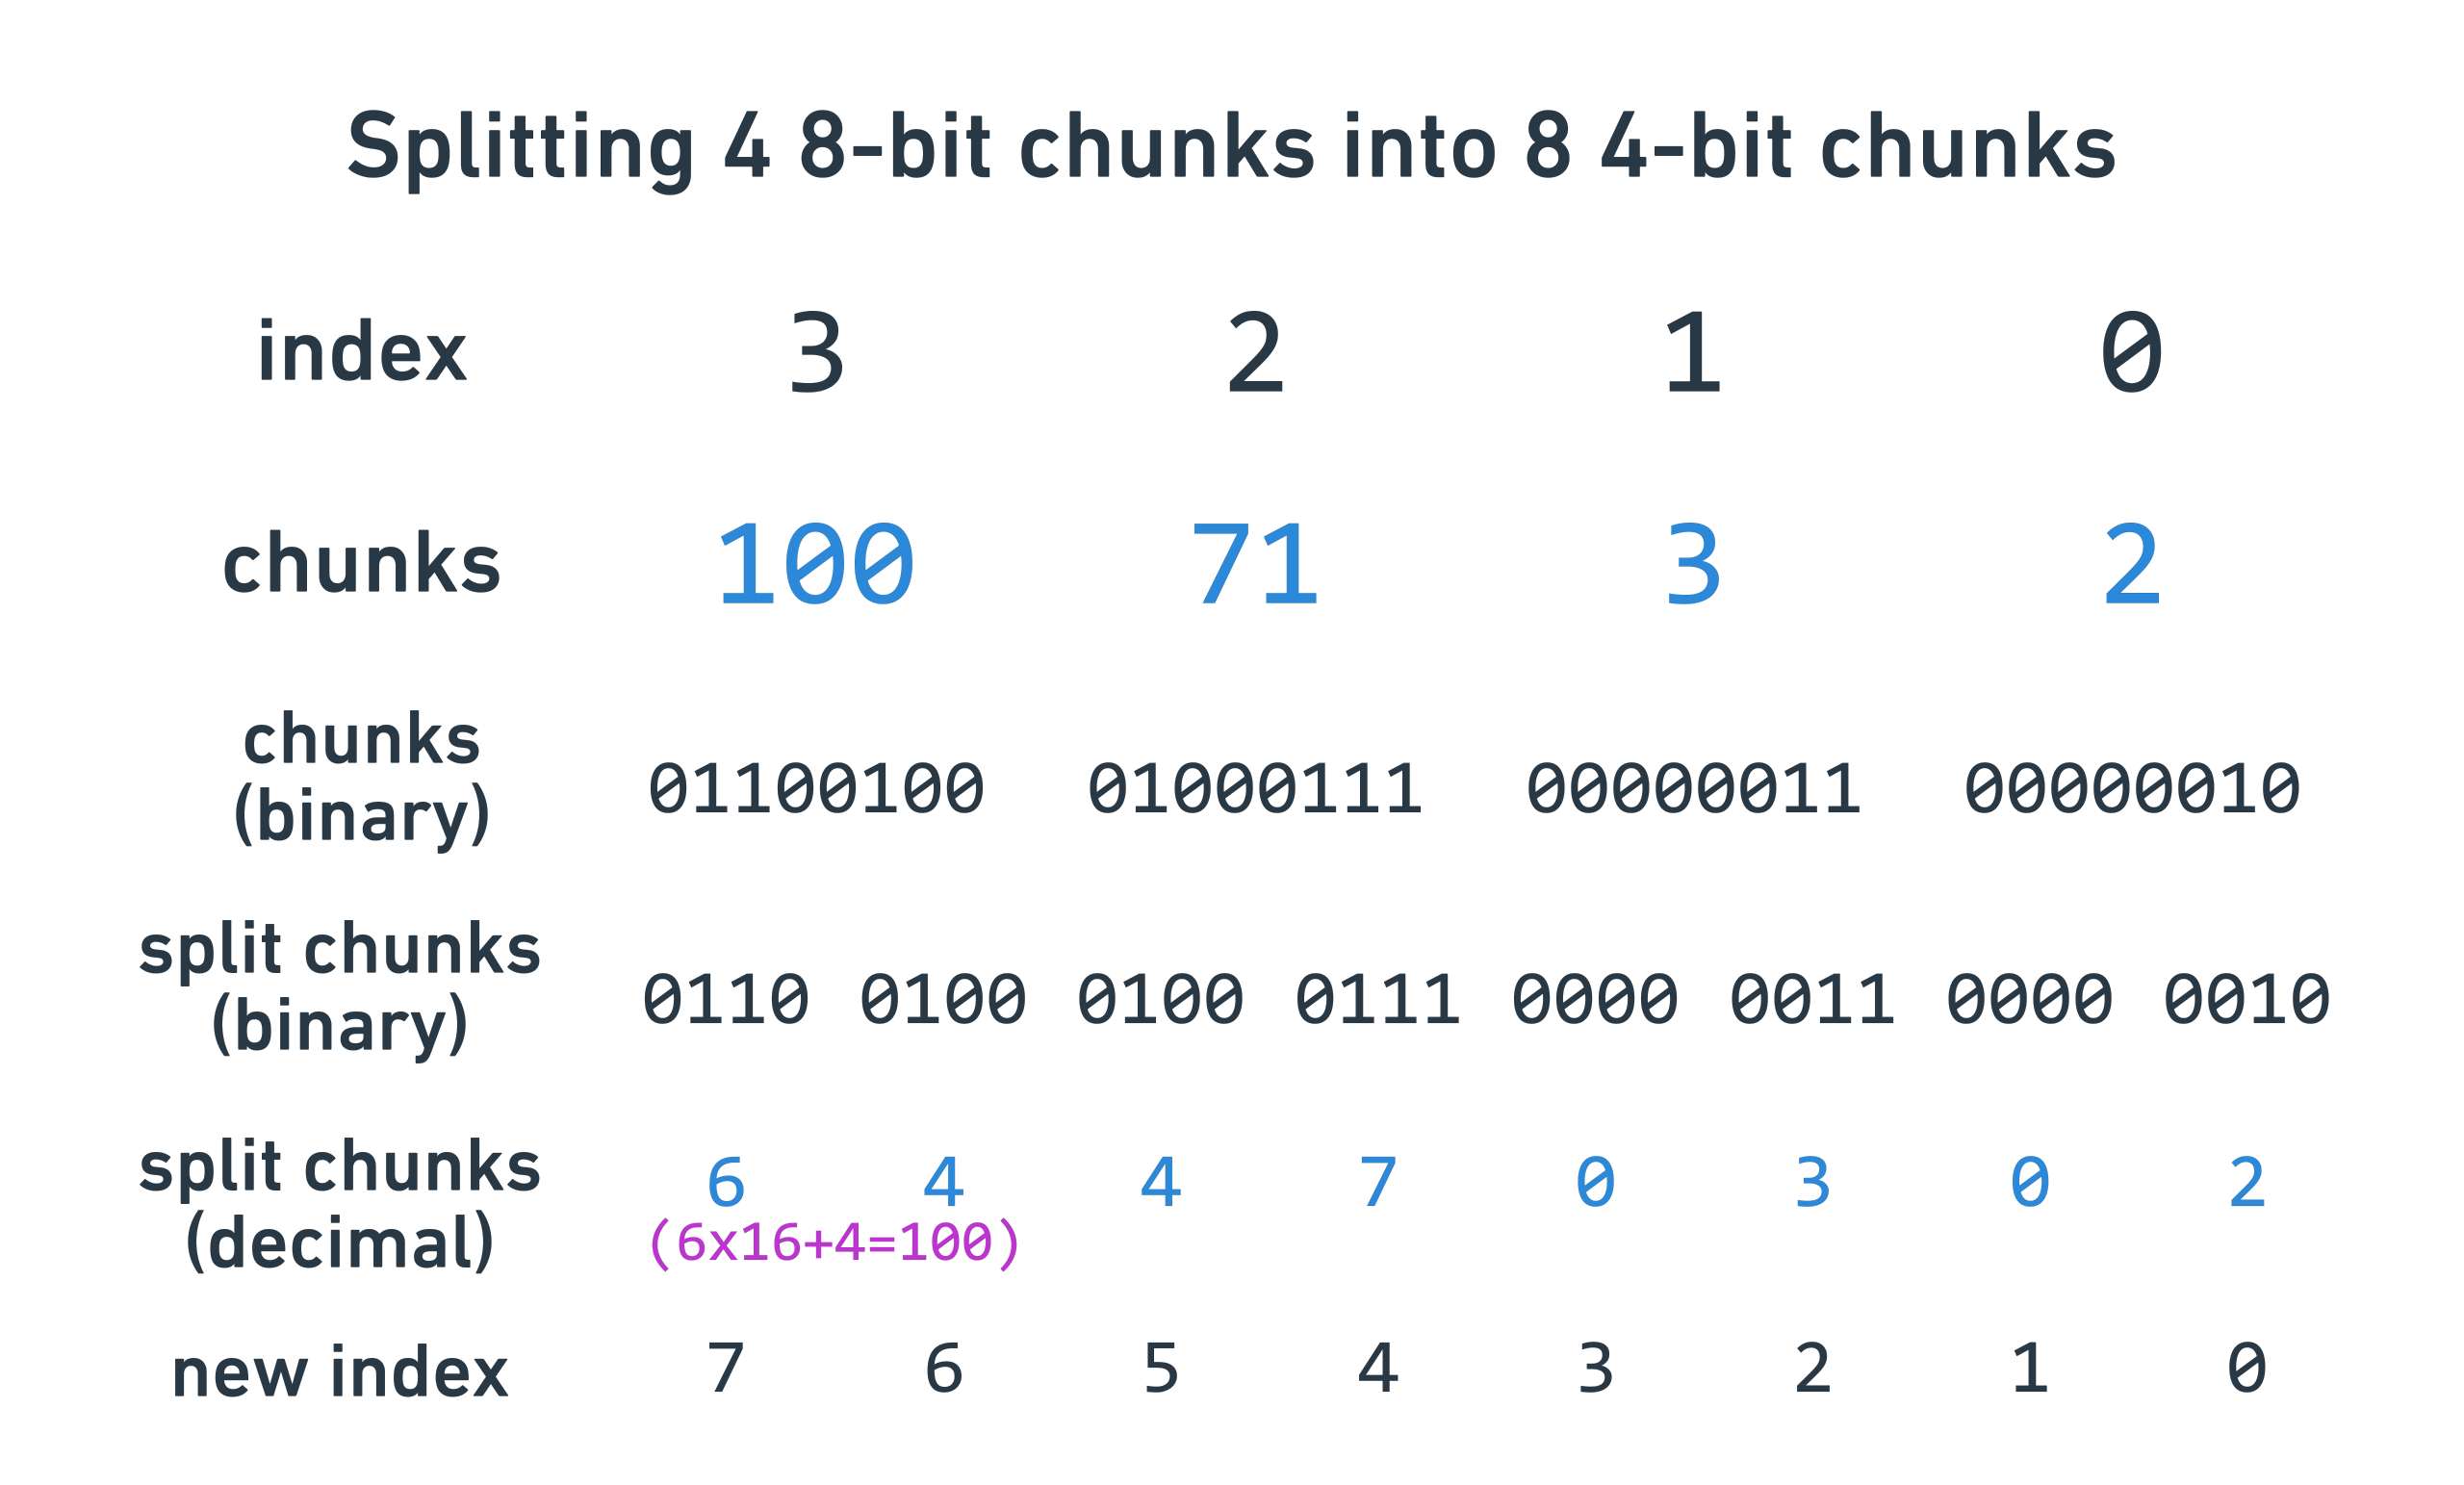
How do we fix this one? The answer is to subdivide again. Before performing the multiplication algorithm, we expand the array of four 8-bit chunks into eight 4-bit chunks. Each 8-bit chunk is split into two 4-bit chunks, one with the lower four bits and one with the higher four bits.
let self_parts_expanded: [i16; 8] = [
    self_parts[0] & 0x0F,
    arith_rightshift(self_parts[0], 4),
    self_parts[1] & 0x0F,
    arith_rightshift(self_parts[1], 4),
    self_parts[2] & 0x0F,
    arith_rightshift(self_parts[2], 4),
    self_parts[3] & 0x0F,
    arith_rightshift(self_parts[3], 4),
];
Now, we can use our multiplication algorithm on these 4-bit chunks, knowing that
a unsigned 4-bit multiplication will result in a u8, which fits inside our
i16. Huzzah!
// Top 12 bits of each i16 should be empty, so read it like a "u4".
// We're simulating Jack which only has i16.
fn u4_array_mul_u4_array(u: &[i16; 8], v: &[i16; 8]) -> [i16; 16] {
    let mut w = [0i16; 16];

    for j in 0..8 {
        let mut carry = 0;
        let vj = v[j];
        for i in 0..8 {
            // Perform signed 16-bit math that will never overflow
            // because we only put u4s into it!  u4 * u4 = u8, which
            // fits in a i16. We can't do use u8s because u8 * u8 =
            // u16 and u16s don't fit in i16.
            let t = u[i] * vj + w[i + j] + carry;

            // Bottom half of the multiply goes into the result; top
            // half becomes carry for the next round.
            w[i + j] = t & 0x0F;
            carry = arith_rightshift(t, 4);
        }
        w[j + 8] = carry;
    }

    w
}
The result is generated in 4-bit chunks, so we need to combine each pair back into one 8-bit chunk, which I won’t show here.
Notice that I use a function to perform the right shift, rather than Rust’s
native >>. This is again because Jack doesn’t have a right shift operator, so
I have to implement it.
// Jack doesn't have these, so we need to reimplement them.
fn arith_rightshift(x: i16, n: i16) -> i16 {
    let mut r = x;

    for _ in 0..n {
        let divided = r / 2;
        // Negative numbers round away from 0, not towards 0.
        r = if r < 0 && divided * 2 != r {
            divided - 1
        } else {
            divided
        }
    }

    r
}
Why didn’t I use modulo? Jack has no modulo

Implementing division
Division is similar to multiplication, but a little more complicated. Just like multiplication, I translated the code from this page. The general gist is also similar to grade school long division, where you generate each quotient digit one by one, multiply the quotient digit by the divisor, and subtract it from the dividend.
We use the same technique of taking the absolute value before performing the algorithm and then negating the result if exactly one of the inputs is odd.
As for the overflow issue, we need to break each 8-bit chunk into two 4-bit
chunks, just like multiplication. The difference is that multiplication goes
like this: 8 chunks * 8 chunks => 16 chunks, while division performs the
inverse: 16 chunks / 8 chunks = 8 chunks. I won’t show the code here, but it
just means the input and output array sizes are different.
Implementing square roots
There are many ways to compute square roots, and most of them involve some sort
of converging formula that you run until you have the desired accuracy. I chose
the Babylonian method for
simplicity. To compute the square root of x:
- Start with a
guessof the true square root. - Compute
x / guess. - Average
guessandx / guessto get a closer estimate of the square root, and updateguess. - Repeat steps 2 and 3 until you’re happy.
All of this is done with integer math, so it’ll find the closest integer square root.

Now that we have our multiplication and division done, we can implement this!
pub fn do_sqrt(&mut self) {
    if self.is_negative() {
        panic!();
    }

    if self.is_zero() {
        return;
    }

    let mut guess = Int32::from(5);
    for _ in 0..20 {
        let mut inv = *self;
        inv.do_div(&guess);

        guess.do_add(&inv);
        guess.do_div(&Int32::from(2));
    }

    self.parts = guess.parts;
}
For simplicity, I started with a guess of 5 and ran 20 iterations every time.
We’ll talk about optimizations later.
Hooray, we finished our Int32 implementation! You can see the final code
here,
along with unit tests. Now, we’ll move on to implementing fixed‑point
arithmetic.
Implementing fixed-point arithmetic
As mentioned above, fixed-point arithmetic involves using a whole number to encode a decimal by multiplying the decimal by a scale factor and storing the resulting number.
Sometimes, a syntax like Q15.17 is used to describe this scheme. The Q15.17
format is 32 bits (15 + 17) and uses 15 bits for pre-decimal point data and 17
bits for post-decimal point data. For example, the old game Quake used
Q16.16 for all of its code because the computers at that time didn’t have fast
floating point math yet.
Correction (thanks nwallin!): the old game Quake used both floating point
arithmetic (what’s used in most computers today) and Q16.16 fixed-point
arithmetic at the same time, in order to maximize performance on old hardware.
Nowadays, that technique wouldn’t help very much.
If Q16.16 was good enough for Quake, it’s probably good enough for me, so I
thought I’d do the same. This means I’ll use 16 bits for post-decimal point
data, which means the scale factor will be 2^16 = 65536, and I’ll be able to
store a decimal point number from -32768 to 32767, with precisions of 1/65536,
or 0.00001525878.
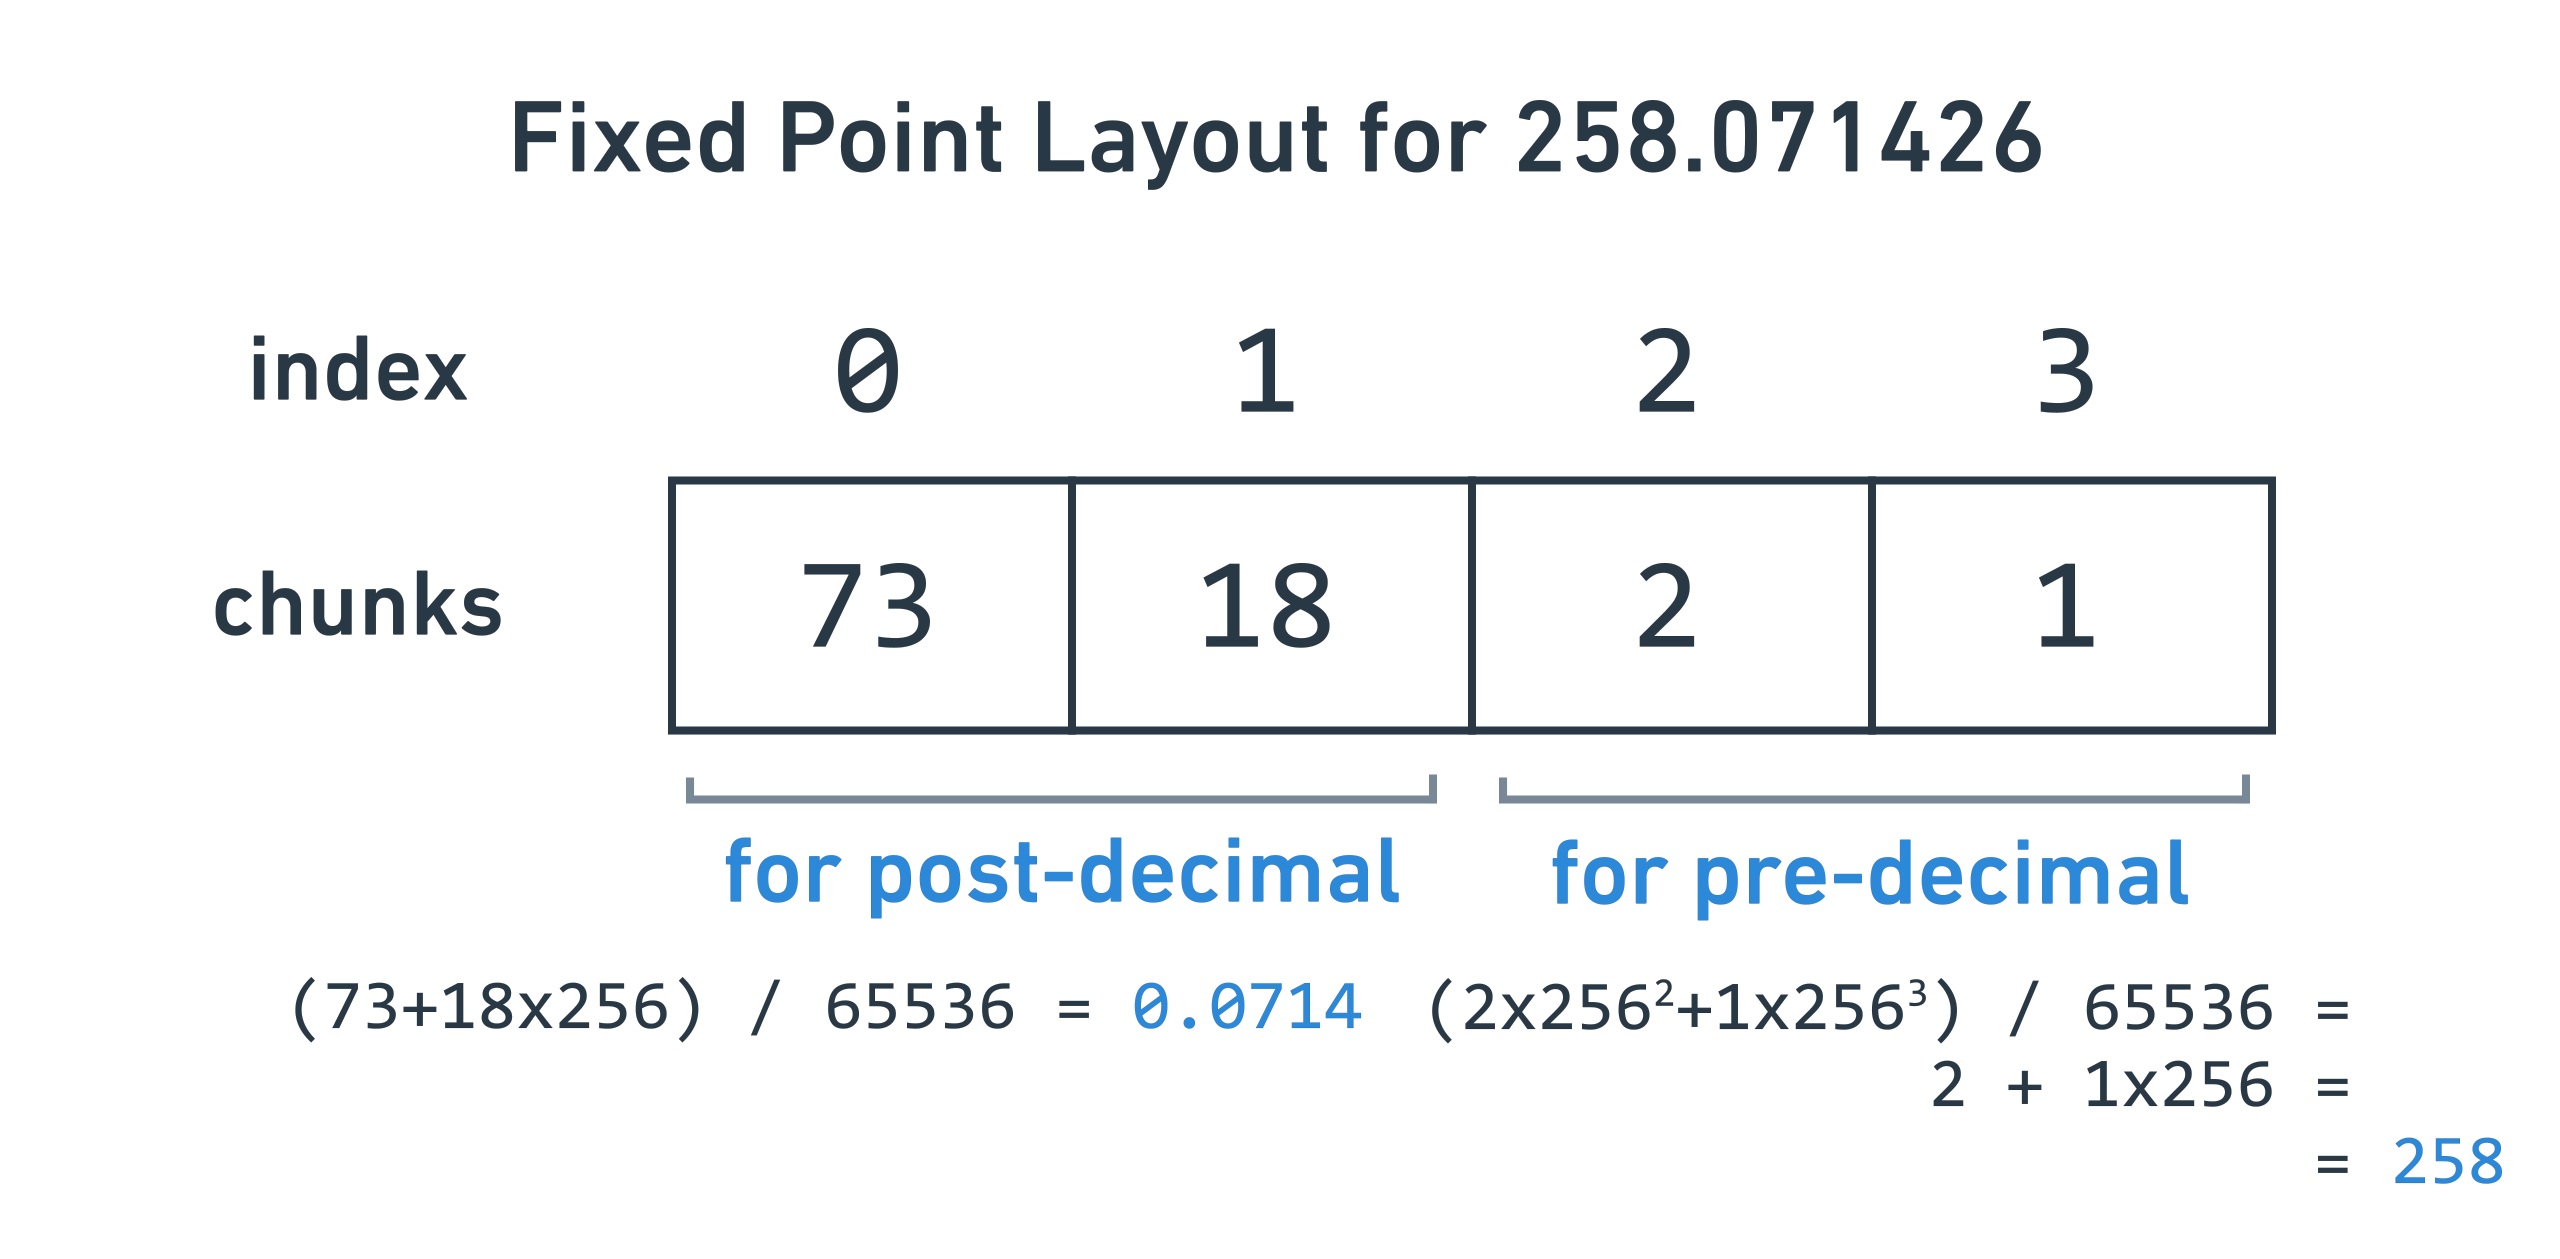
As a result of this scheme, it happens that the top two i16s in the Int32
parts array will be for pre-decimal point data, and the bottom two for
post-decimal point data.
Now, we’ll talk about how to implement fixed-point math, using what we built earlier.
Constructing a fixed Number from a regular int
To construct a Number from a regular int, we need to wrap it in a Int32,
then multiply it by the scale factor:
pub fn from(i: i16) -> Number {
    let mut r = Int32::from(i);
    r.do_left_shift_bytes(2);
    Number(r)
}
I wrote a handy function on Int32 to handle the shift left for us. Shifting
left by 2 bytes is the same as multiplying by 2^16, the scale factor.
Implementing addition and subtraction
Addition and subtraction are fairly easy, because adding or subtracting two
Numbers that have the same scale factor is as simple as performing the
operation on their backing Int32s.
pub fn do_add(&mut self, other: &Number) {
    self.0.do_add(&other.0);
}

pub fn do_sub(&mut self, other: &Number) {
    self.0.do_sub(&other.0);
}
Implementing multiplication
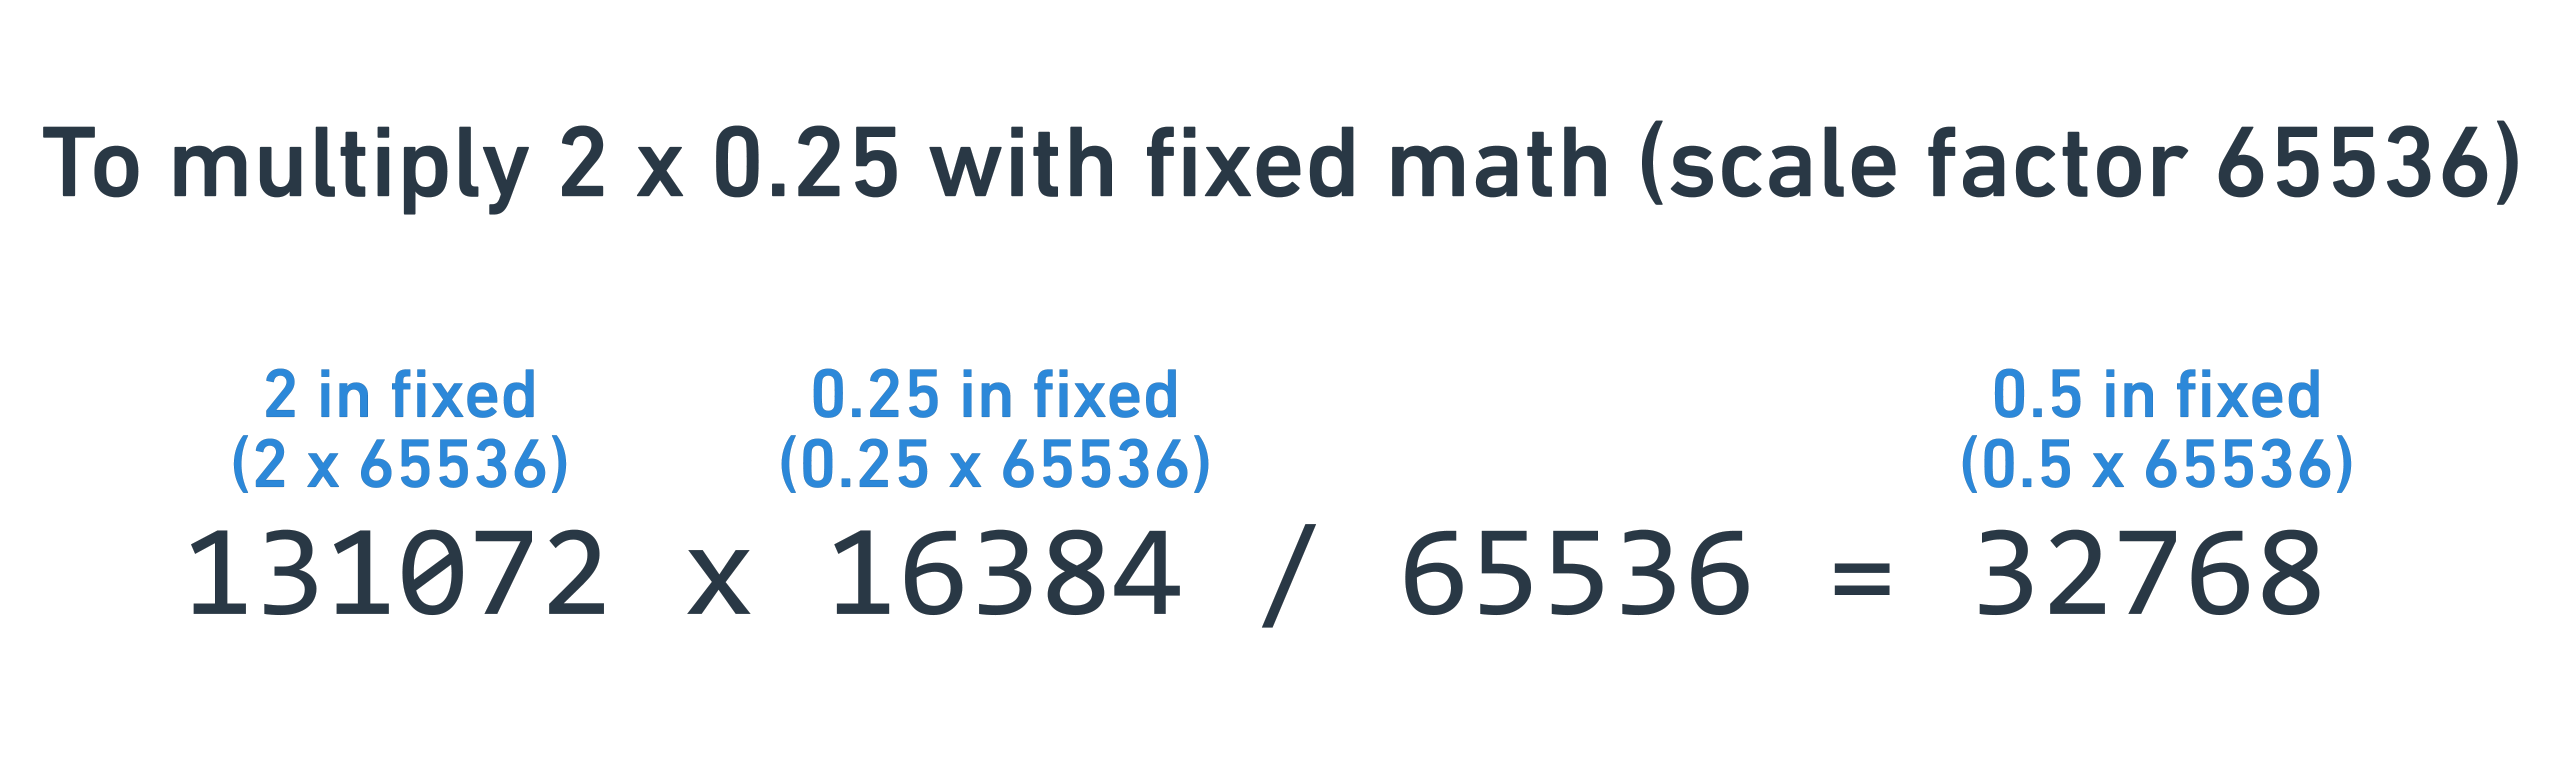
To multiply two fixed numbers, we can multiply their backing Int32s. However,
the resulting number will have an extra multiply by the scale factor, so we need
to divide by the scale factor afterwards to cancel it out.
pub fn do_mul(&mut self, other: &Number) {
    self.0.do_mul(&other.0);
    self.0.do_div(&SCALE_FACTOR);
}
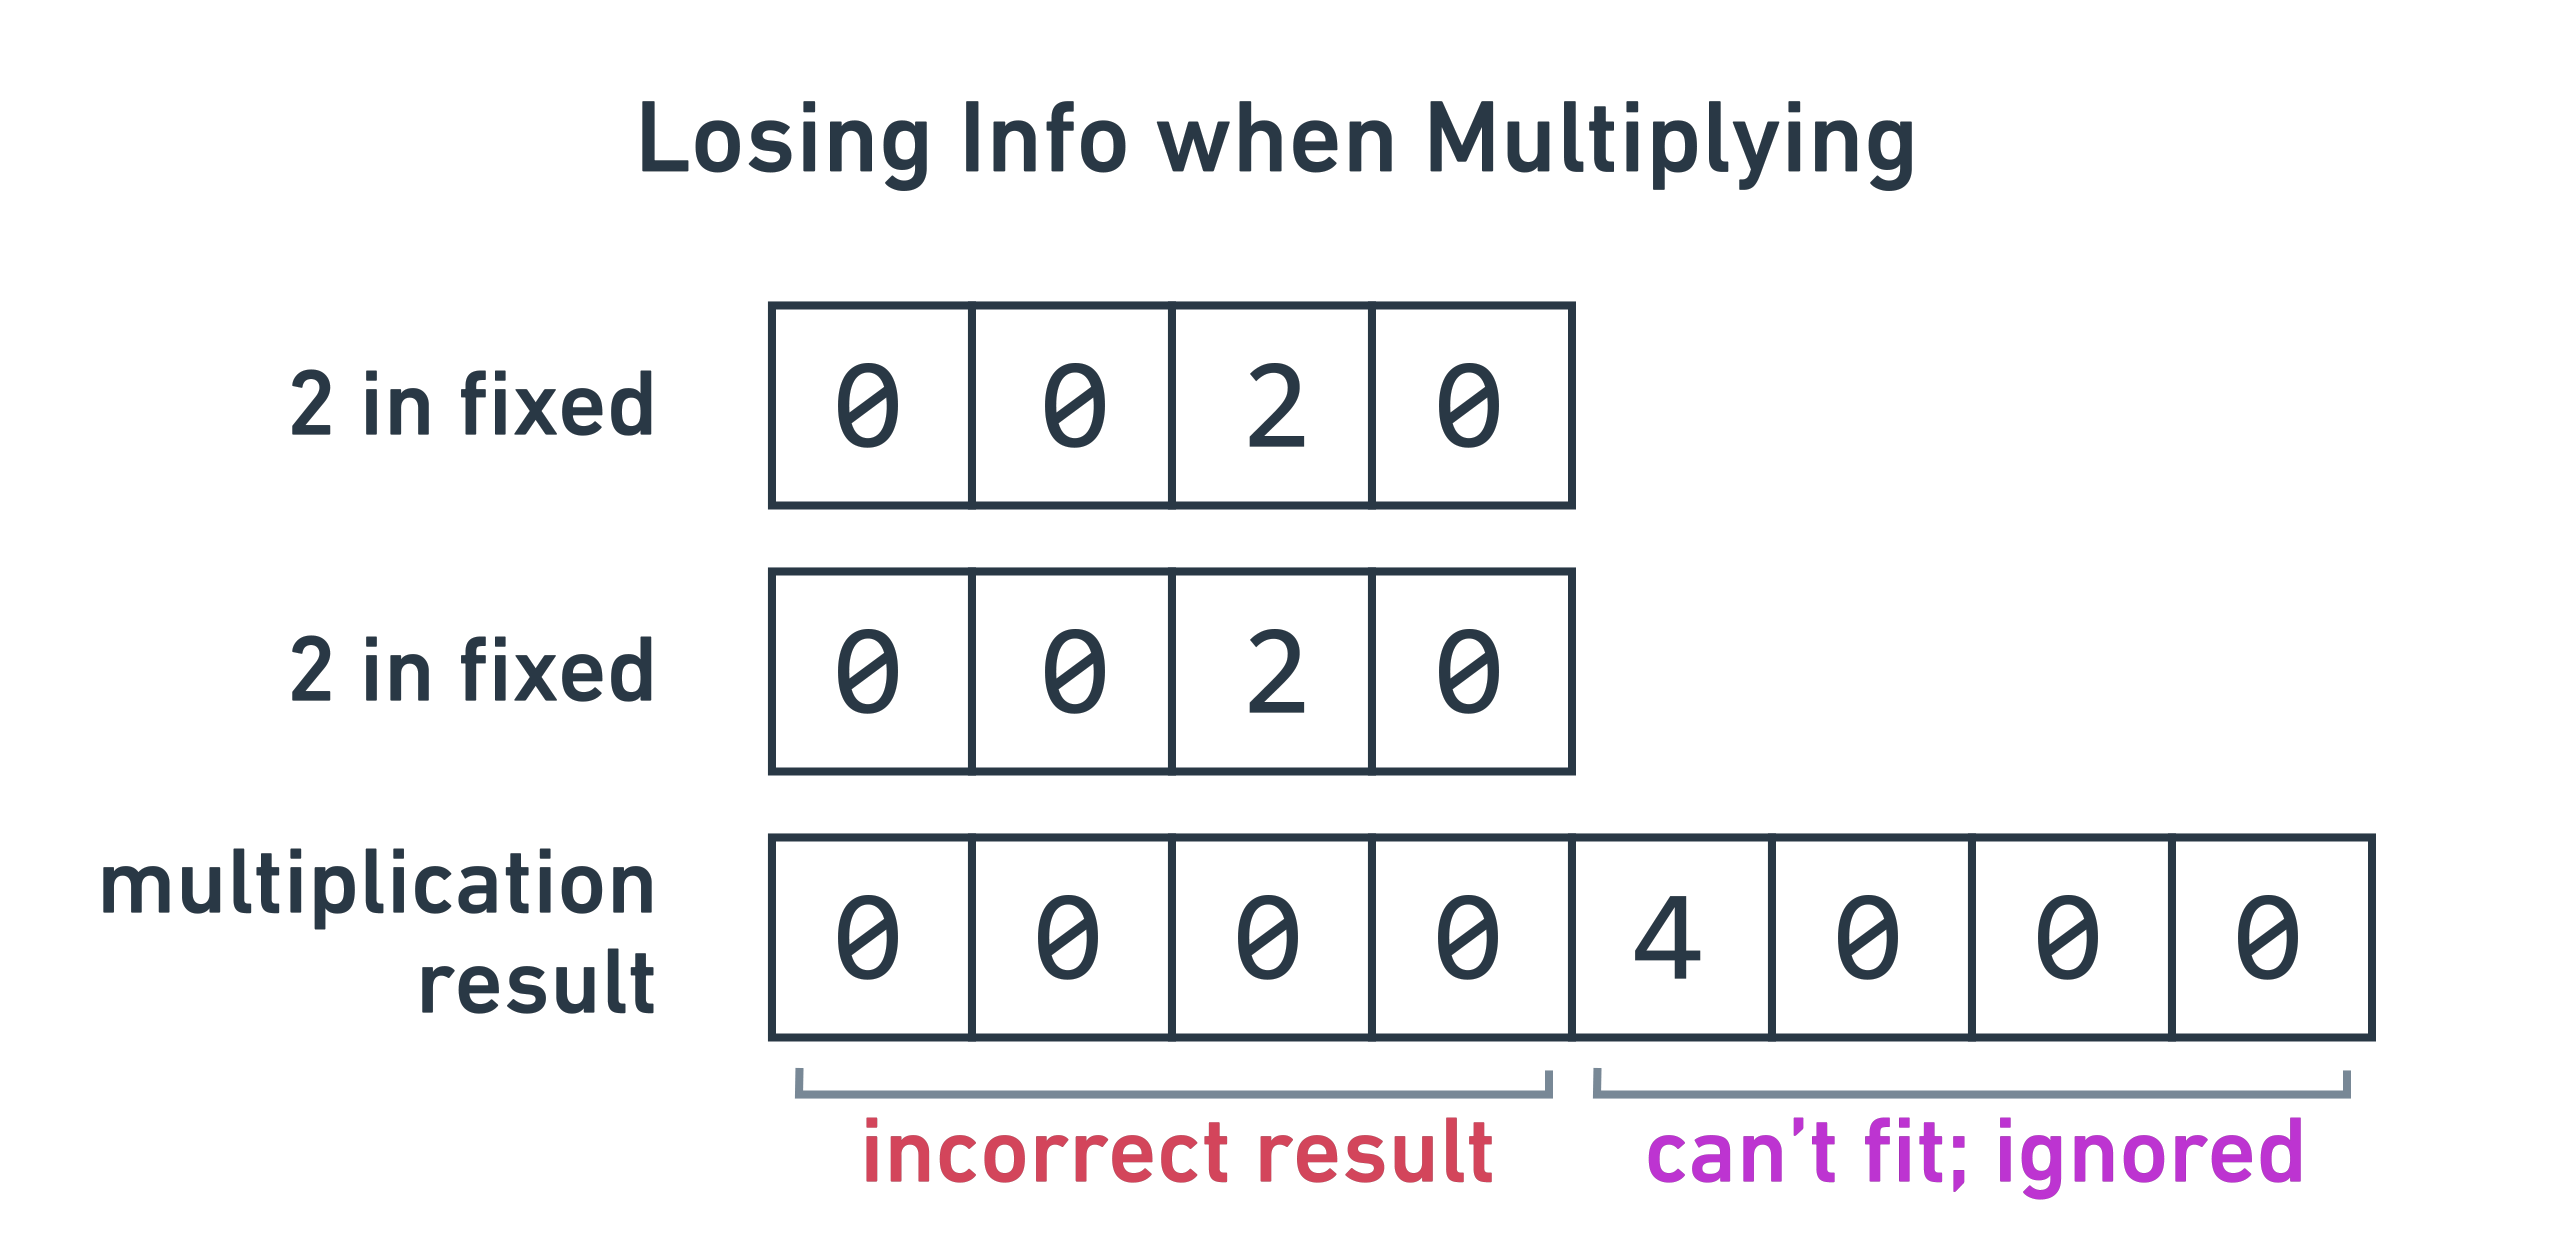
This poses a serious issue. If we try to do 2 * 2 in our fixed math, the
underlying Int32s will perform 131072 * 131072, which will overflow the
Int32’s max of 2,147,483,647 (2^31 - 1).
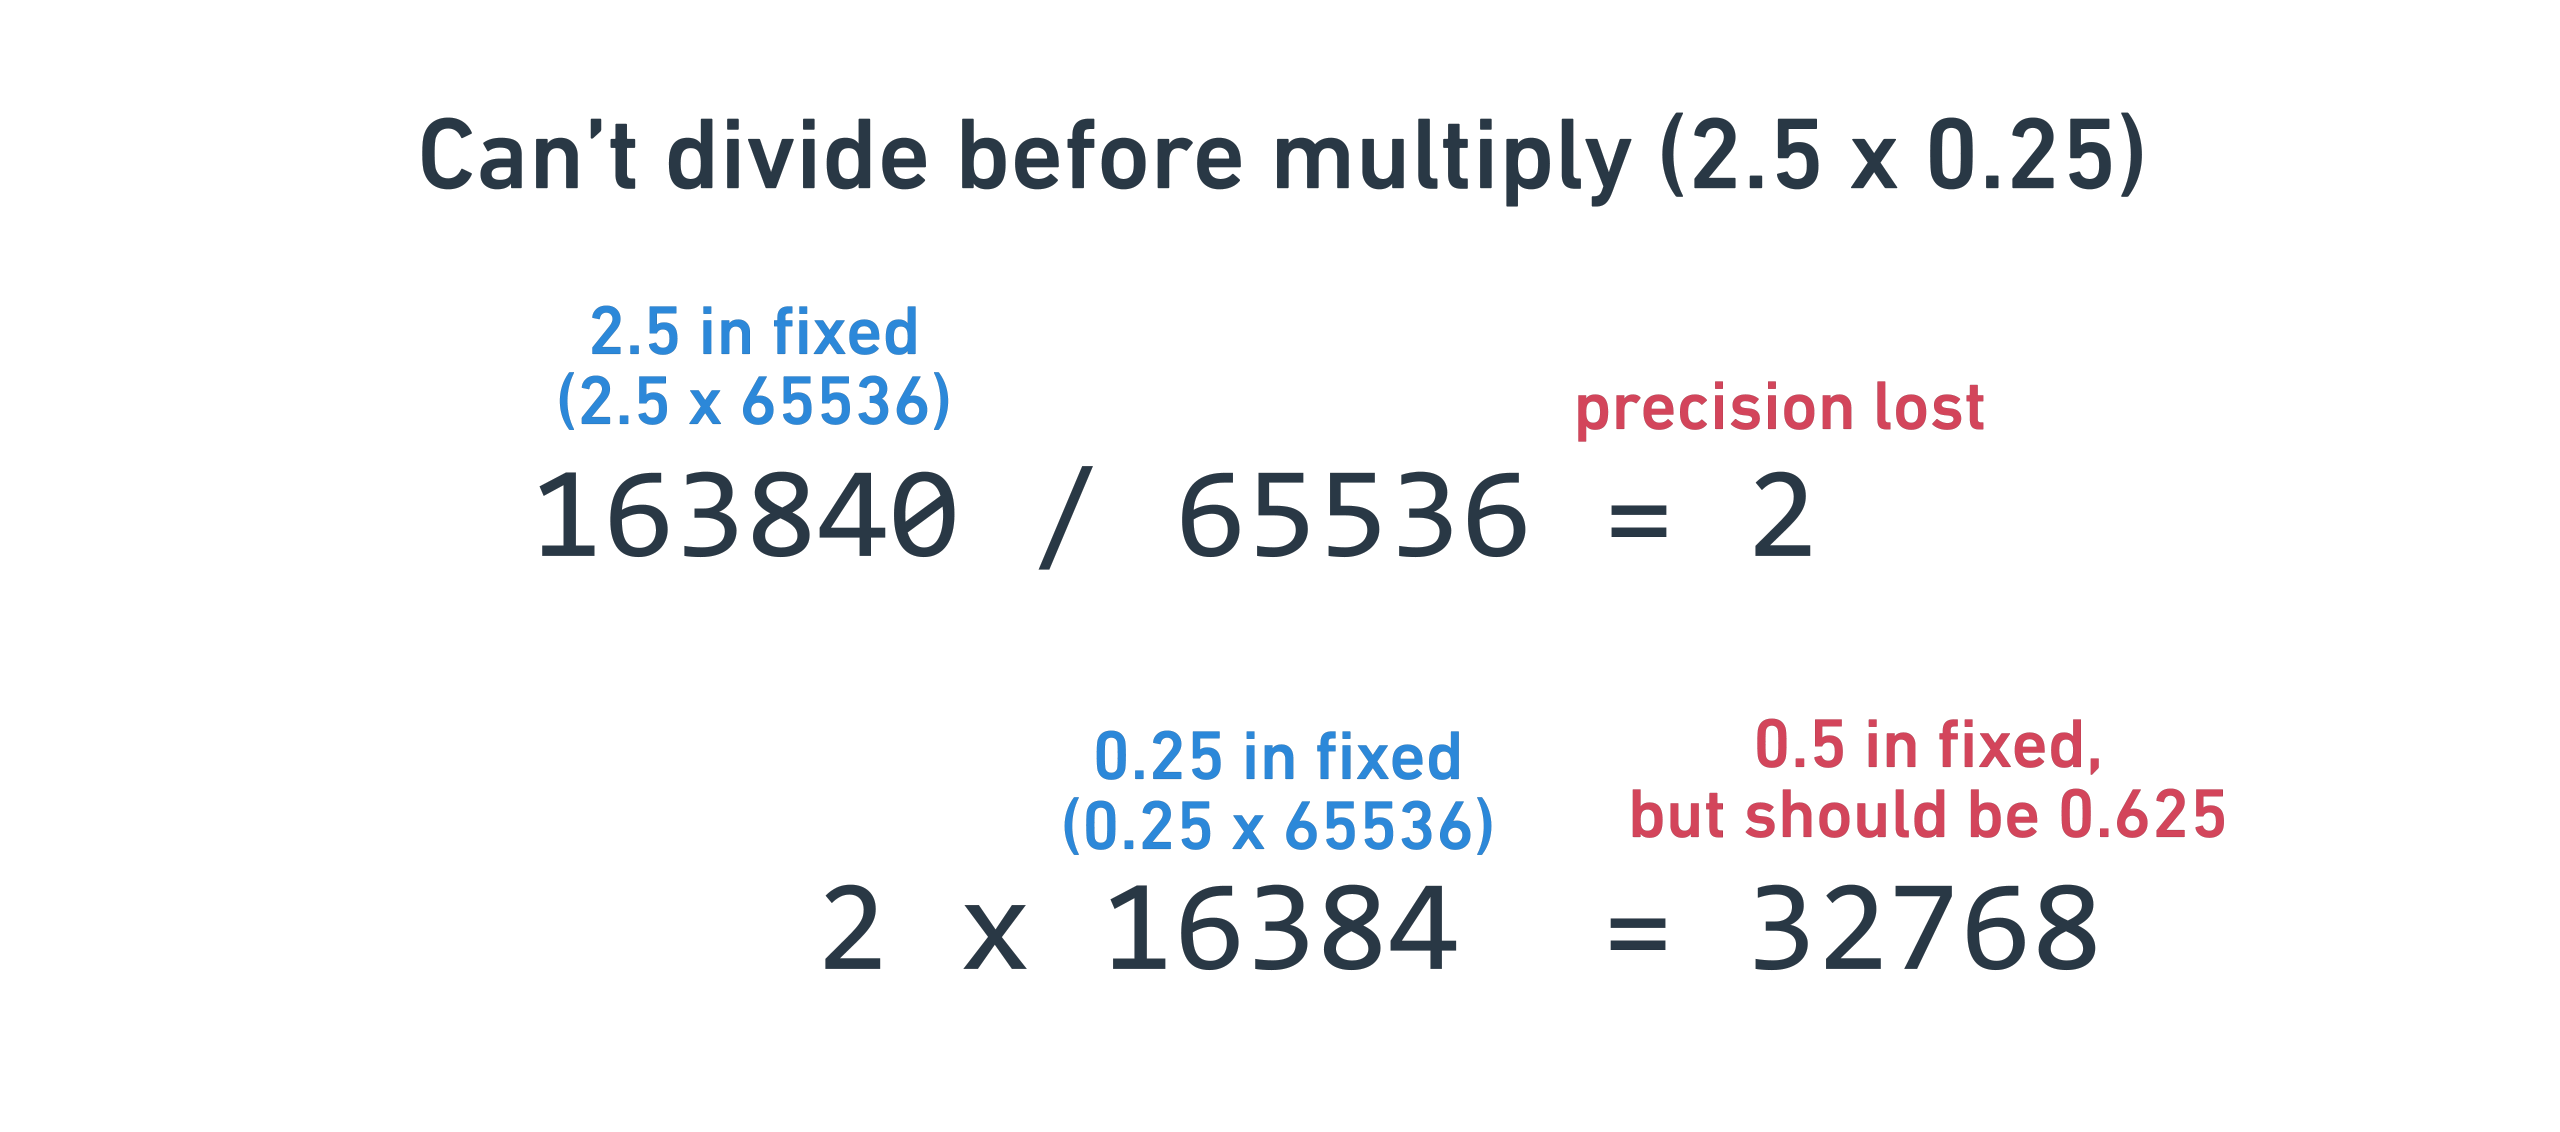
We could consider dividing by the scale factor prior to multiplying, but this has the serious disadvantage of throwing away all of the post-decimal point information of one of the multiplicands.
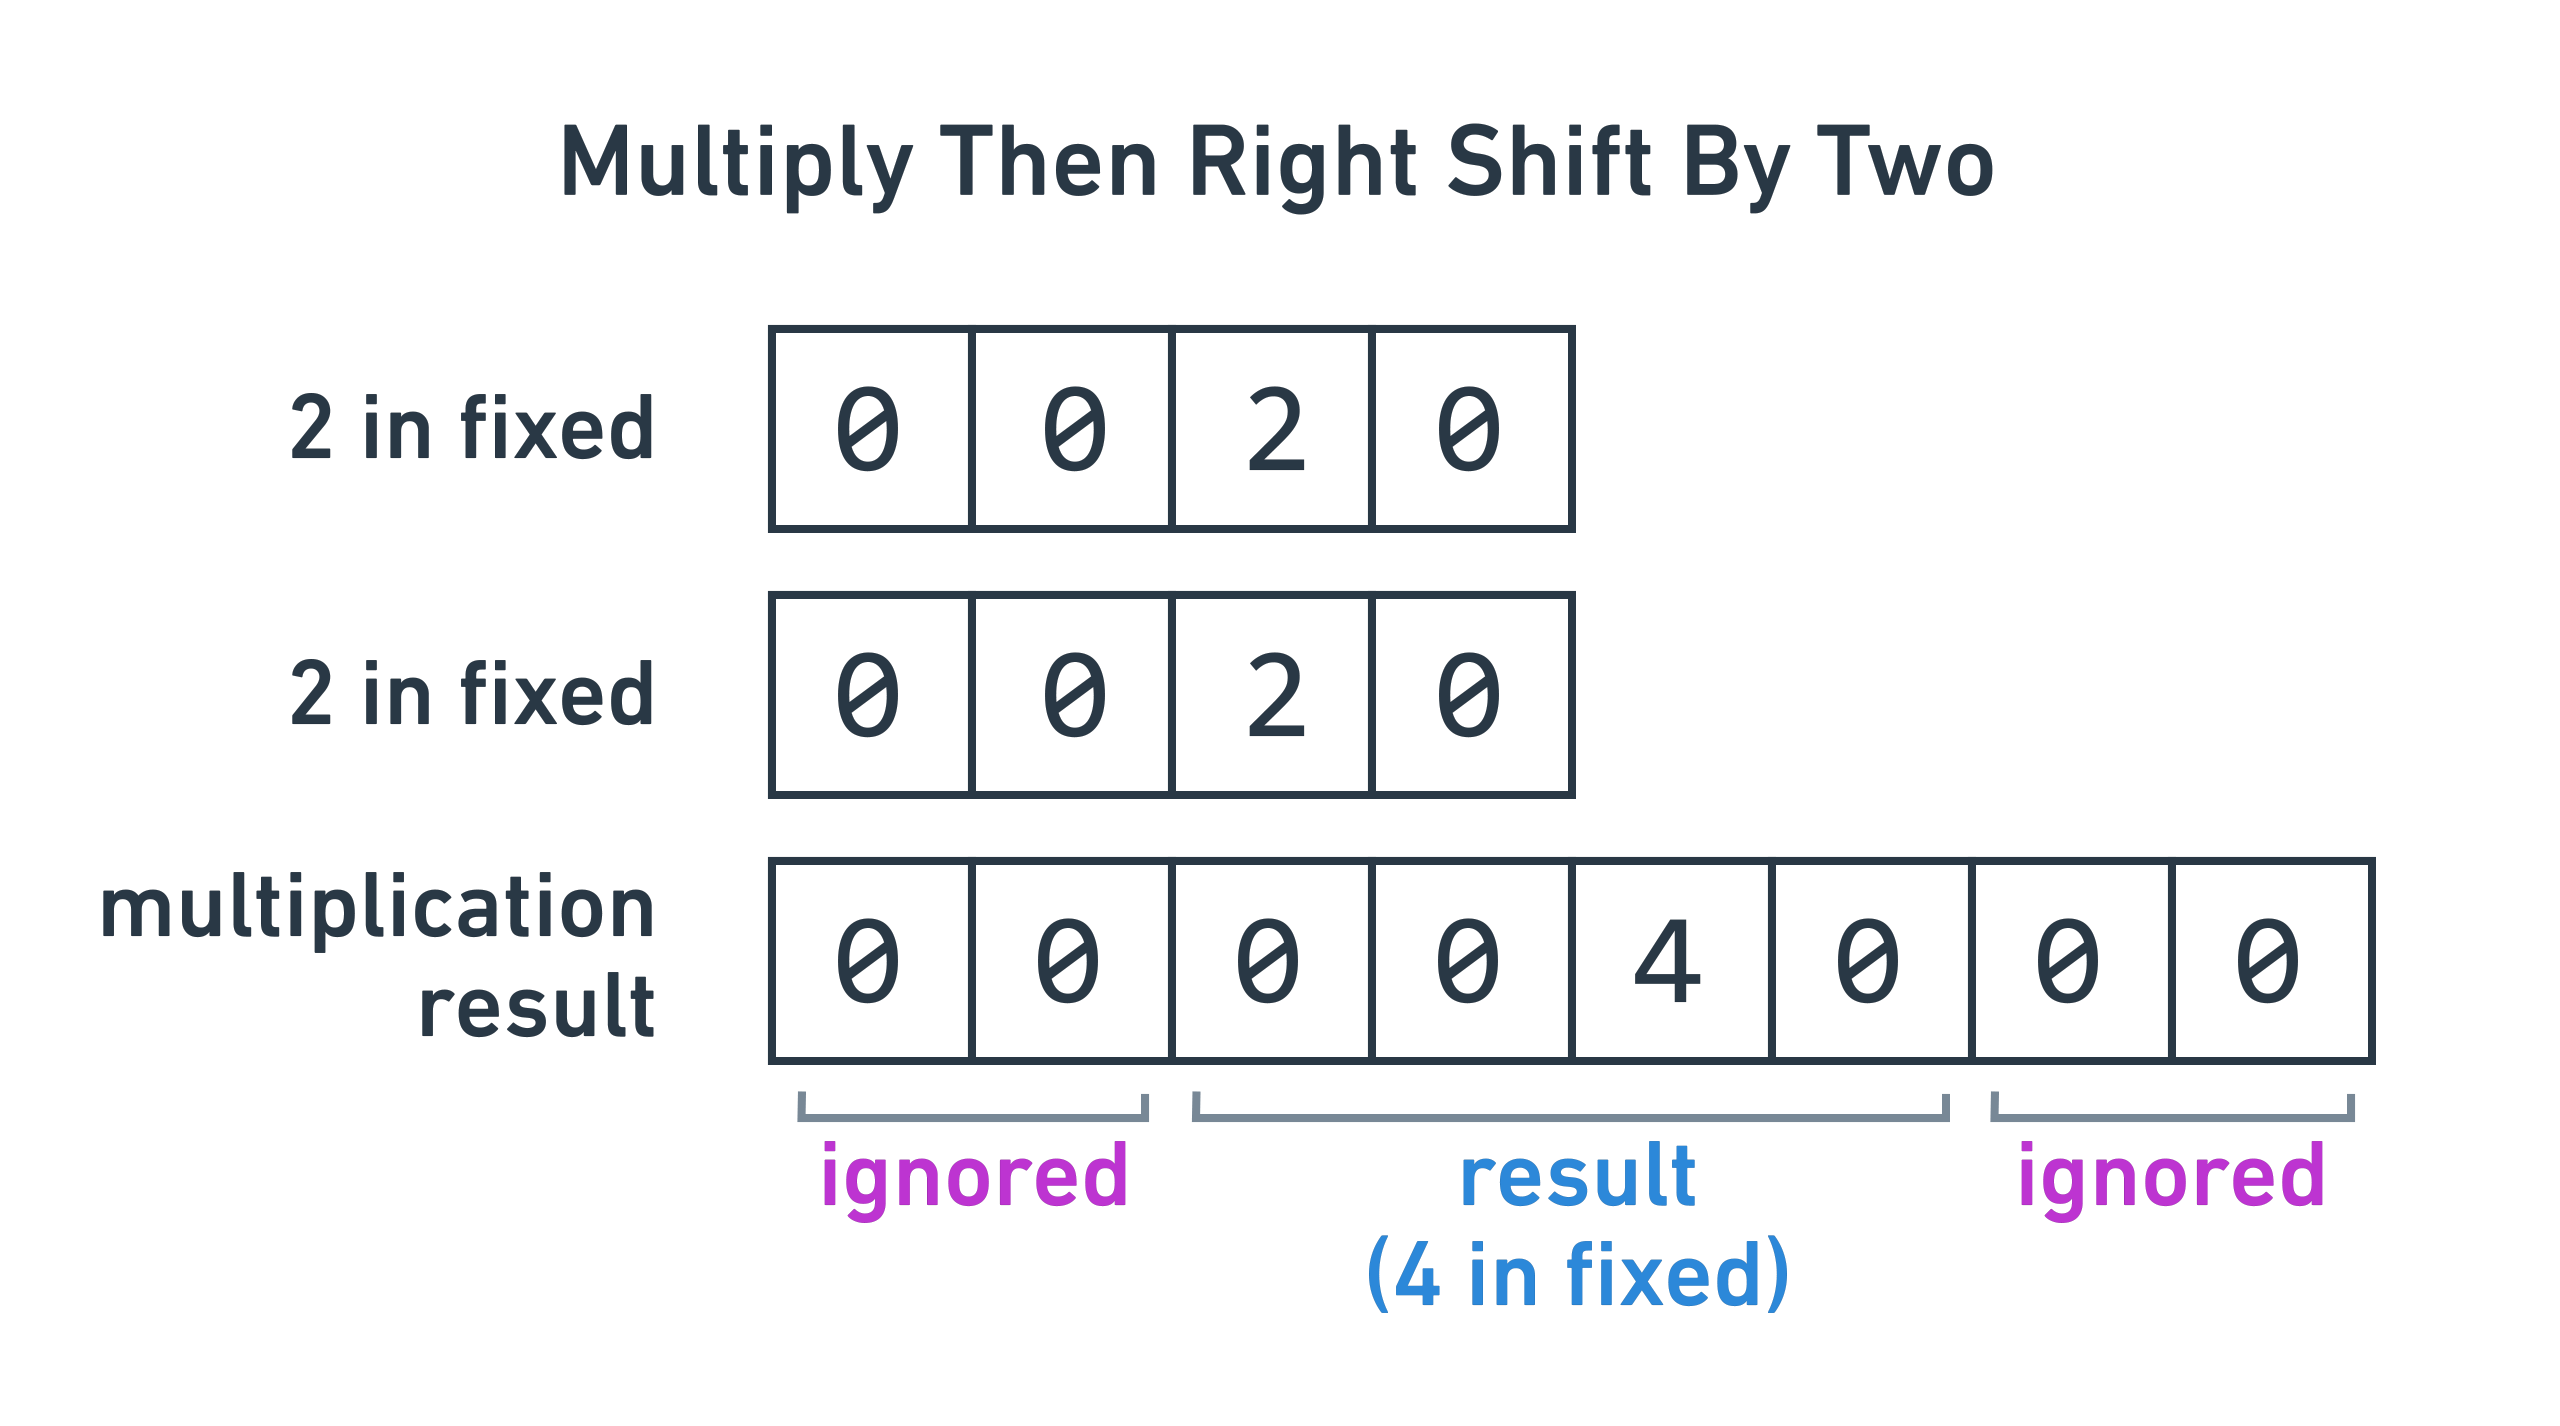
To solve this, I realized that the output of the multiplication function is eight chunks of eight bits, but we can only store the bottom four chunks of eight bits, so we normally ignore the top four chunks.
However, if the multiplication function takes a “bytes to right shift” argument,
it can read from higher chunks and change the information that is ignored. For
example, if right_shift_bytes is 0, it reads from result chunks 0-3. If
it’s 1, it reads from result chunks 1-4. This technique allows us to fuse
the multiply and divide together to avoid losing information in between. The
divide is accomplished by the right shift, because right shifting the parts by 1
is equivalent to dividing by 256 (8 bits).
pub fn do_mul(&mut self, other: &Number) {
    self.0.do_mul_right_shift_bytes(&other.0, 2);
}
Conveniently, since we chose a scale factor that aligns with our array scheme,
we can pass 2 as right_shift_bytes and get the desired result.
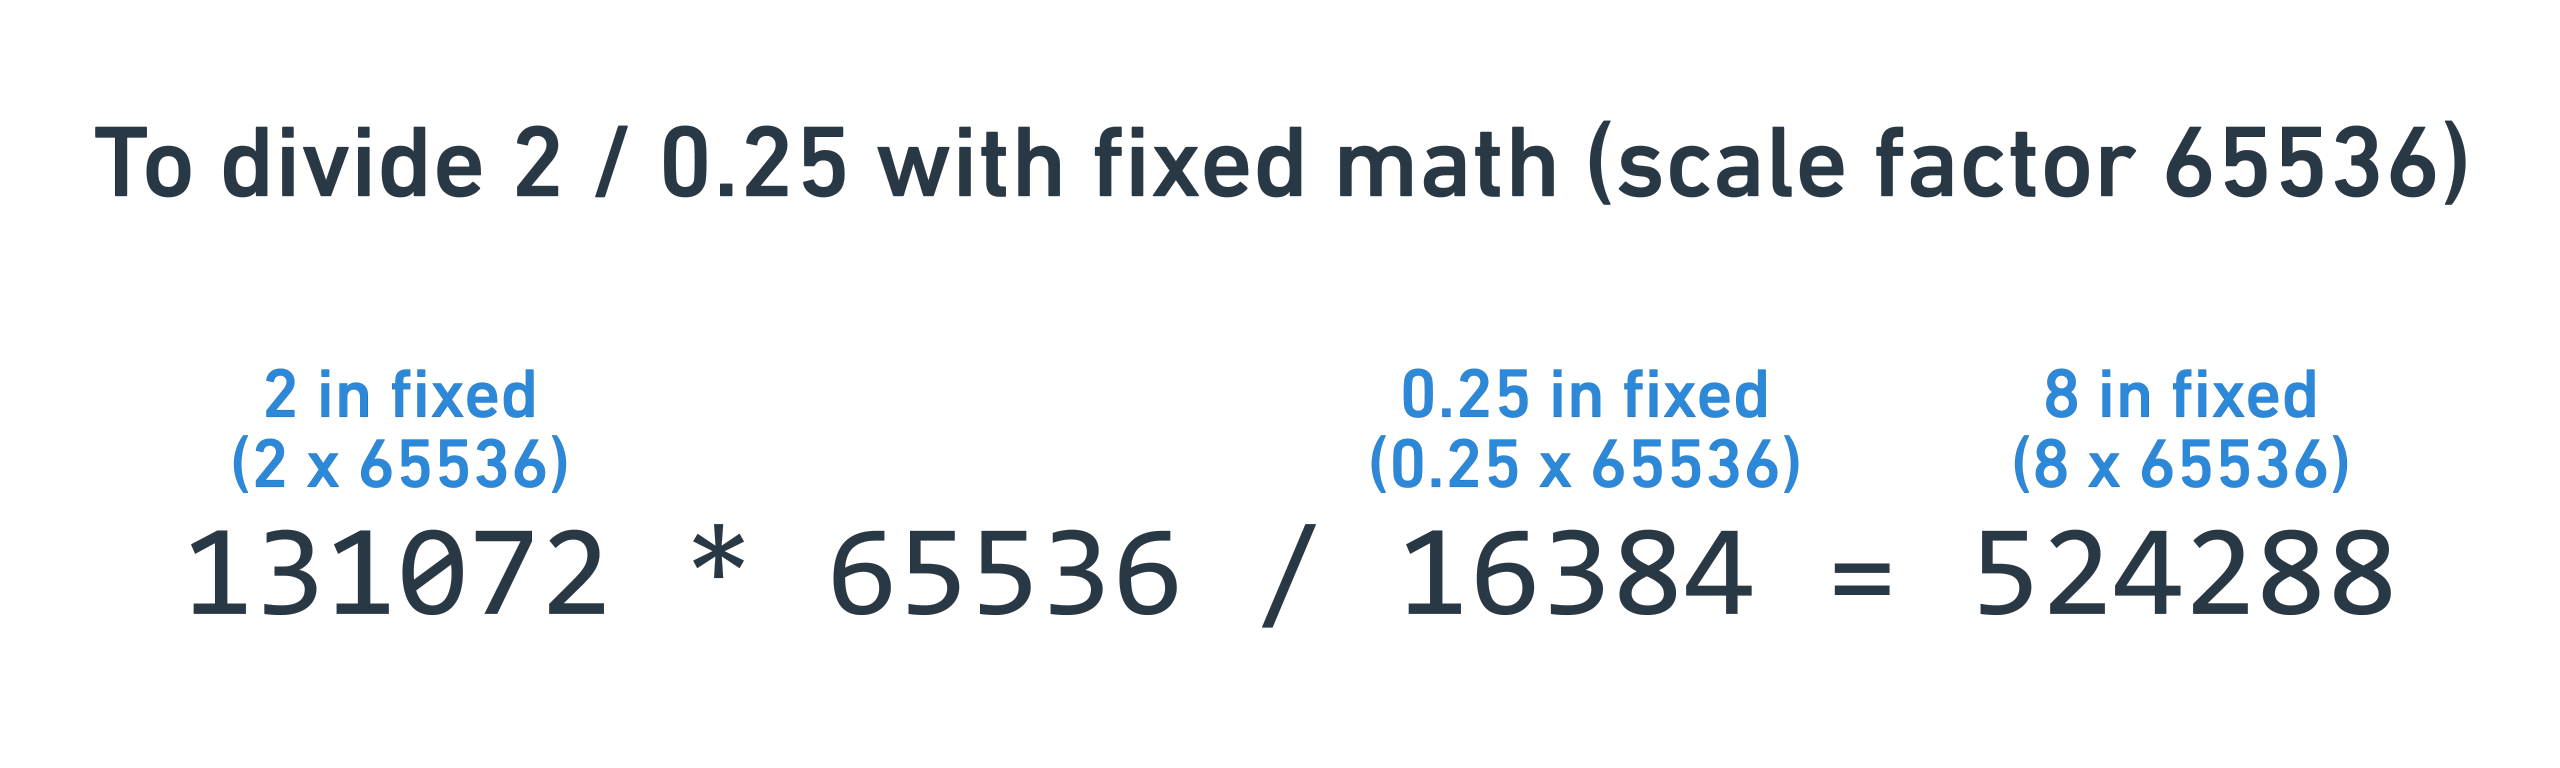
Implementing division
Division is similar to multiplication, but we need to multiply by the scale factor beforehand to avoid an extra scale factor in the denominator.
pub fn do_div(&mut self, other: &Number) {
    self.0.do_mul(&SCALE_FACTOR);
    self.0.do_div(&other.0);
}
But just like multiplication, we can bundle the multiplication with the division
to avoid loss of precision or overflow. The result is do_left_shift_bytes_div:
pub fn do_div(&mut self, other: &Number) {
    self.0.do_left_shift_bytes_div(2, &other.0);
}
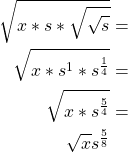
Implementing square roots
Just like multiplication and division, square roots involve performing the
underlying Int32 operation and correcting the scale factor. In this case,
taking the square root will leave the resulting number scaled by
sqrt(scale factor), so we need to multiply beforehand by the scale factor to
cancel this out. We also know that we should multiply before the square root for
maximum precision, which is the same as multiplication above. Here’s what that
looks like, if x is the original number and s is the scale factor:

The problem with this scheme is overflow. If we multiply by the scale factor, we
risk overflowing the Int32. In practical terms, it means we can’t take the
square root of a Number that’s larger than 1, which is a serious problem.
To solve this, I spread the multiplication partially before and partially after
the square root. I first multiplied by sqrt(sqrt(scale factor)) to add some
“breathing room” for better precision.
After this operation, the scale factor is incorrect, so I take the result and
multiply by s^(3/8), which is the triple square root of the scale factor
cubed, to arrive back at s^1.
pub fn do_sqrt(&mut self) {
  let mut sqrt_sqrt_s = SCALE_FACTOR;
  sqrt_sqrt_s.do_sqrt();
  sqrt_sqrt_s.do_sqrt();

  let mut sqrt_sqrt_sqrt_s = sqrt_sqrt_s;
  sqrt_sqrt_sqrt_s.do_sqrt();

  self.0.do_mul(&sqrt_sqrt_s);
  self.0.do_sqrt();
  self.0.do_mul(&sqrt_sqrt_sqrt_s);
  self.0.do_mul(&sqrt_sqrt_sqrt_s);
  self.0.do_mul(&sqrt_sqrt_sqrt_s);
}
The net result is that we can take square roots up to 2048, which was good enough for me. The tradeoff is that we lose some precision from not doing all of the multiplication up front.
Expressing π
We’ll need π for the raytracer, but how do we express it? Jack, having no decimal point types, has no decimal point literal, so I’ll need to figure out a way to put it in code.
If we follow the fixed-point algorithm, we can multiply π by the scale factor 65536 and truncate to get what would be stored for π.
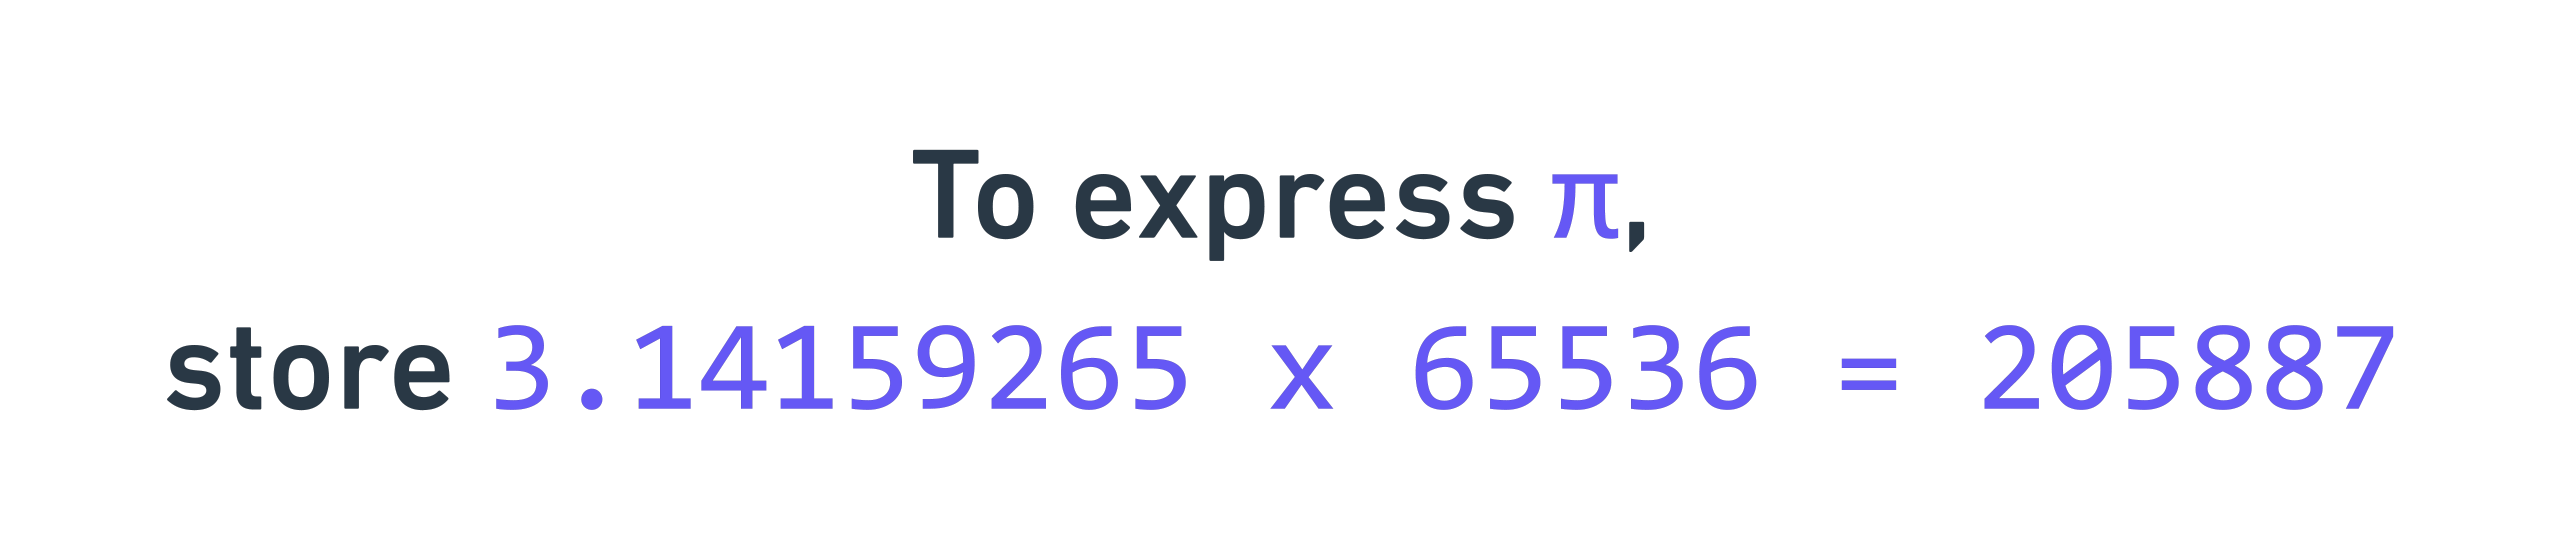
However, we run into a second issue: this number is larger than a i16, so we
can’t just write Number::from(205887). To solve this, I factored 205,887 into
two numbers, 561 and 367, and multiplied them together. I also added a new
function to wrap a raw Int32 with a Number. This will not scale the
number, so I get a Number that encodes 205887 / 65536 = π rather than
205,887.
pub static ref pi: Number = {
    let mut x = Int32::from(561);
    let y = Int32::from(367);
    x.do_mul(&y);
    Number(x) // not Number::from(205887)
};
What about trigonometry?
Functions like sine, cosine, and tangent are often necessary for linear algebra,
so do we need them for the raytracer? Thankfully, no. Only tangent is used in
the original blog post, and it can be easily removed. If I had to build them,
I’d use a hardcoded lookup table in the range [0, π / 4] and use trigonometric
identities to map all other inputs into that range. Luckily, no need for this.
We finally finished building fixed-point arithmetic, and can at last implement the raytracer! You can see the Rust fixed-point implementation here.
Implementing the raytracer
As mentioned above, I borrowed the code for the raytracer from
this blog post,
but replaced all of the native numbers with our shiny Number. For example,
here’s the original ray generation code and my reimplementation:
Original:
pub fn create_prime(x: u32, y: u32, scene: &Scene) -> Ray {
    let aspect_ratio = (scene.width as f64) / (scene.height as f64);
    let sensor_x = (
      ((x as f64 + 0.5) / scene.width as f64) * 2.0 - 1.0
    ) * aspect_ratio;
    let sensor_y = 1.0 - ((y as f64 + 0.5) / scene.height as f64) * 2.0;

    Ray {
        origin: Point::zero(),
        direction: Vector3 {
            x: sensor_x,
            y: sensor_y,
            z: -1.0,
        }
        .normalize(),
    }
}
Mine:
pub fn create_prime_ray(&self, pixel_x: i16, pixel_y: i16) -> Ray {
    assert!(self.width > self.height);

    let scene_width = Number::from(self.width);
    let scene_height = Number::from(self.height);

    let one = Number::from(1);
    let two = Number::from(2);

    let mut half = Number::from(1);
    half.do_div(&two);

    let mut aspect_ratio = scene_width;
    aspect_ratio.do_div(&scene_height);

    let mut sensor_x = Number::from(pixel_x);
    sensor_x.do_add(&half);
    sensor_x.do_div(&scene_width);
    sensor_x.do_mul(&two);
    sensor_x.do_sub(&one);
    sensor_x.do_mul(&aspect_ratio);

    let mut sensor_y = Number::from(pixel_y);
    sensor_y.do_add(&half);
    sensor_y.do_div(&scene_height);
    sensor_y.do_neg();
    sensor_y.do_mul(&two);
    sensor_y.do_add(&one);

    let mut direction = Vec3 {
        x: sensor_x,
        y: sensor_y,
        z: Number::from(-1),
    };
    direction.do_normalize();

    Ray {
        origin: Vec3 {
            x: Number::from(0),
            y: Number::from(0),
            z: Number::from(0),
        },
        direction: direction,
    }
}
It’s the same logic, just more verbose because of the mutational math, but it’ll save us a ton of time when we get to the Jack part.
Here’s the raytracing algorithm I implemented, at a high level:
- For each pixel in the image, shoot a ray out like a laser pointer to “see” what’s in the world.
- Test to see if the ray collides with any object and finds the closest colliding object.
- Figure out what color the pixel should be by considering the color of object, the direction of the lighting in the scene, and whether or not the point is in shadow.
Once I wrote all this functionality in Rust with the Number class, I was ready
to get a first render! The Rust raytracer can write the output grayscale
directly to a file, so we can see what it looks like:
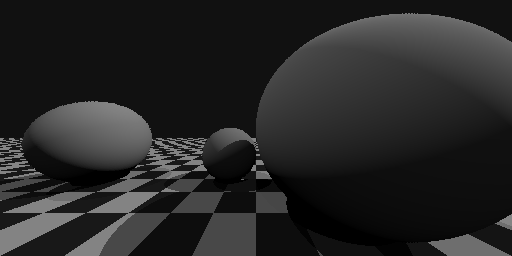
Woohoo!
Implementing dithering
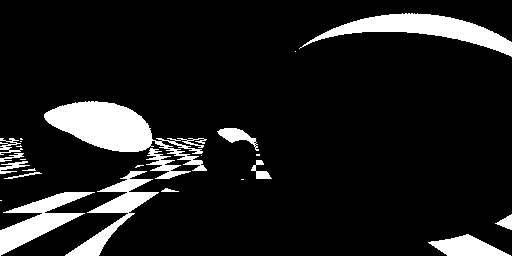
The Hack computer only supports black and white, which means we’ll need a technique to map the grayscale output of the raytracer to either black or white. If we do a simple round, the result looks pretty bad:
Luckily, there are algorithms can colocate black and white pixels together to trick our eyes into seeing gray, called dithering. This is the same technique used by printers and newspapers to achieve shades of gray with only black ink.
I chose Floyd-Steinberg dithering because it looked fairly simple to implement, while giving fairly good results. To implement this, I keep a parallel grid of the quantization errors and add them whenever I render the next pixel.
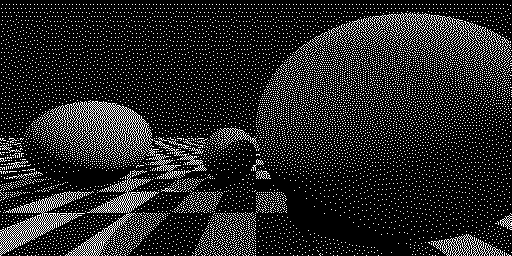
Believe it or not, there’s no gray pixels in this image. With this, the Rust raytracer was complete, and I got my first complete render! Time to port it to Jack.
Translating to Jack
To port the code to Jack, I manually went through each line and translated it to
Jack. That usually involved fixing up syntax and adding a lot of dos. However,
I ran into a few issues I didn’t anticipate during the Rust step.
First, I didn’t realize that Jack has no break, continue, or for loops, so
I had to translate each loop to a while loop. It wasn’t too bad, but it
incurred some risk of off-by-one errors. If I had used only while loops in
Rust, it would’ve helped derisk this step, but that would’ve been a little
annoying.
Second, I ran into a few gotchas about order of operations. Jack has no order of
operations, so 2 + 3 * 5 evaluates to 25, not 17. I had a few bugs crop up
because I forgot to aggressively parenthesize. However, mutative math was a
lifesaver here because the order of operations is encoded in the order of the
statements, so most of the math was safe.
Third, I forgot that Arrays in Jack are not initialized, and keep whatever value happens to be lying in them when they’re allocated. This was an infuriating bug to track down, because when I added print statements to debug, the problem went away! Once I figured out the issue, I realized that the print statements were allocating memory, which caused the memory handed to my buggy code to switch from an area of memory with preexisting values to an area of memory with all zeroes, masking the problem.
I had written an extensive unit test suite for all of the Rust math, which was incredibly beneficial. I chose not to port it to Jack to avoid having to write more Jack code. In retrospect, I think this was still a good idea, as all of my Jack bugs fell into one of the above categories, rather than being complex logical bugs.
Memory Management Pain
The main pain of translating to Jack was actually memory management. Rust does a
phenomenal job mostly abstracting this away without requiring garbage
collection, which is one of its signature strengths. However, Jack, while having
a Java-like syntax, actually has a memory management system more like C. Every
allocation needs to be manually deallocated using Memory.deAlloc. Every class
is expected to implement a dispose() method, which deconstructs the object and
its fields, and you must manually call this method whenever the object is
about to go out of scope.
As those who’ve written C before know, this is a big pain. If you use something after it’s been deallocated, the program crashes. If you accidentally deallocate something twice, the program crashes. If you forget to deallocate it, it causes a memory leak. With the tiny RAM of the HACK computer, any leak in the rendering loop immediately causes a out-of-memory crash (OOM).
Addressing this took by far the most time. I had to carefully go through each
line, looking for accidental leaks and deallocating them. They were nontrivial
to locate, especially in if branches where objects are conditionally
allocated. For example, the simple Rust code:
let t0: Number = /* elided */;
let t1: Number = /* elided */;
return (if t0.is_less_than(&t1) { t0 } else { t1 });
needs to become this Jack code:
if (t0.is_less_than(t1)) {
  do t1.dispose();
  return t0;
} else {
  do t0.dispose();
  return t1;
}
because otherwise the unused Number would leak. This made the code
significantly more complex, because you have to track the flows of objects
through logic and function calls to make sure it’s ultimately freed. Rust, of
course, does this for you with its ownership system. It was a little ironic that
I was using one of the best systems for managing memory alongside one of the
simplest systems.
To detect leaks, I made use of allocation counting to track the number of allocations of a particular class:
class Int32 {
  static int allocs;

  constructor Int32 new(int i) {
    // We have a new Int32; increase counter.
    let allocs = allocs + 1;

    /* elided */

    return this;
  }

  method void dispose() {
    // We're getting rid of an Int32; decrease counter.
    let allocs = allocs - 1;

    do parts.dispose();
    do Memory.deAlloc(this);
    return;
  }

  function void printAllocs() {
    do Output.printString("int32 allocs: ");
    do Output.printInt(allocs);
    do Output.println();
    return;
  }
}
Then, you can track allocations of any piece of logic:
do Int32.printAllocs();
someFuncThatMightLeak();
do Int32.printAllocs();
If the number of allocations increases, you have a leak. If it decreases, you’re deallocating too many times. I used this technique to progressively narrow down where leaks were happening and squash them one by one.
The greatest saving grace with this part of the process was having mutational math. It would’ve been an utter nightmare if every operation returned a new object that I had to clean up, not to mention a performance hit:
let x = Number.new(3);
let y = Number.new(2);

let xx = x.mul(y);
let sum = xx.plus(y);
let sumTwice = sum.mul(y);

// Need to clean up all the intermediate objects.
do x.dispose();
do xx.dispose();
do y.dispose();
do sum.dispose();
return sumTwice;
vs:
let x = Number.new(3);
let y = Number.new(2);

do x.do_mul(y);
do x.do_add(y);
do x.do_mul(y);

// Only one Number to dispose!
do y.dispose();
return x;
Dealing with real OOMs
Once I had all the leaks fixed, I quickly ran into real out-of-memory (OOM) issues. Previous, the OOMs were because I was leaking memory, but now I was actually using too much space.
The culprit was dithering. My original algorithm kept one Number for each
pixel (a 512x256 Array) to remember the quantization error from Floyd-Steinberg
dithering. Here’s the pseudocode for what I did:
dither_pixel := array[512][256]()

for each y from top to bottom do
    for each x from left to right do
        # Perform raytracing.
        pixel_color := raytrace(x, y)
        # Add in any quantization error from previous pixels.
        pixel_color := pixel_color + dither_pixel[x][y]

        newpixel := round oldpixel to 0 or 1
        draw newpixel to (x, y)

        # Calculate the quantization error.
        quant_error := oldpixel - newpixel

        # Distribute it to neighboring pixels.
        dither_pixel[x + 1][y    ] := quant_error × 7 / 16
        dither_pixel[x - 1][y + 1] := quant_error × 3 / 16
        dither_pixel[x    ][y + 1] := quant_error × 5 / 16
        dither_pixel[x + 1][y + 1] := quant_error × 1 / 16
The issue is that a Number takes at least six slots in memory: one for the
Number, one for the Int32 inside, and four for the four-element Array.
6 slots/pixel * 512 pixels/row * 256 pixels/column = 768,432 slots, far
exceeding the 32K Hack computer RAM.
To solve this, I realized that I only needed to keep the dither pixels for the
current and next row, which means only
6 slots/pixel * 512 pixels/row * 2 rows = 6,144 slots. However, this still
exceeded the RAM of the machine. I guess along with everything else that was
allocated, it couldn’t all fit.
dither_pixel := array[512]()
next_row_dither_pixel := array[512]()

for each y from top to bottom do
    for each x from left to right do
        # Perform raytracing.
        pixel_color := raytrace(x, y)
        # Add in any quantization error from previous pixels.
        pixel_color := pixel_color + adjacent_dither + dither_pixel[x]

        newpixel := round oldpixel to 0 or 1
        draw newpixel to (x, y)

        # Calculate the quantization error.
        quant_error := oldpixel - newpixel

        # Distribute it to neighboring pixels.
        adjacent_dither := quant_error × 7 / 16
        next_row_dither_pixel[x - 1] := quant_error × 3 / 16
        next_row_dither_pixel[x    ] := quant_error × 5 / 16
        next_row_dither_pixel[x + 1] := quant_error × 1 / 16

    # After processing a row, flip the arrays, so the next row reads
    # from what used to be next_row_dither_pixel.
    temp := next_row_dither_pixel
    next_row_dither_pixel := dither_pixel
    dither_pixel := temp
To solve this, I had to get even smarter about saving memory. To do this, I
realized that the quantization error is always between -1 and 1. Therefore,
using a whole Number, which can handle -32768 to 32767, is a waste of the two
slots that handle the pre-decimal point part of the number, since it’s always
between -1 and 1.
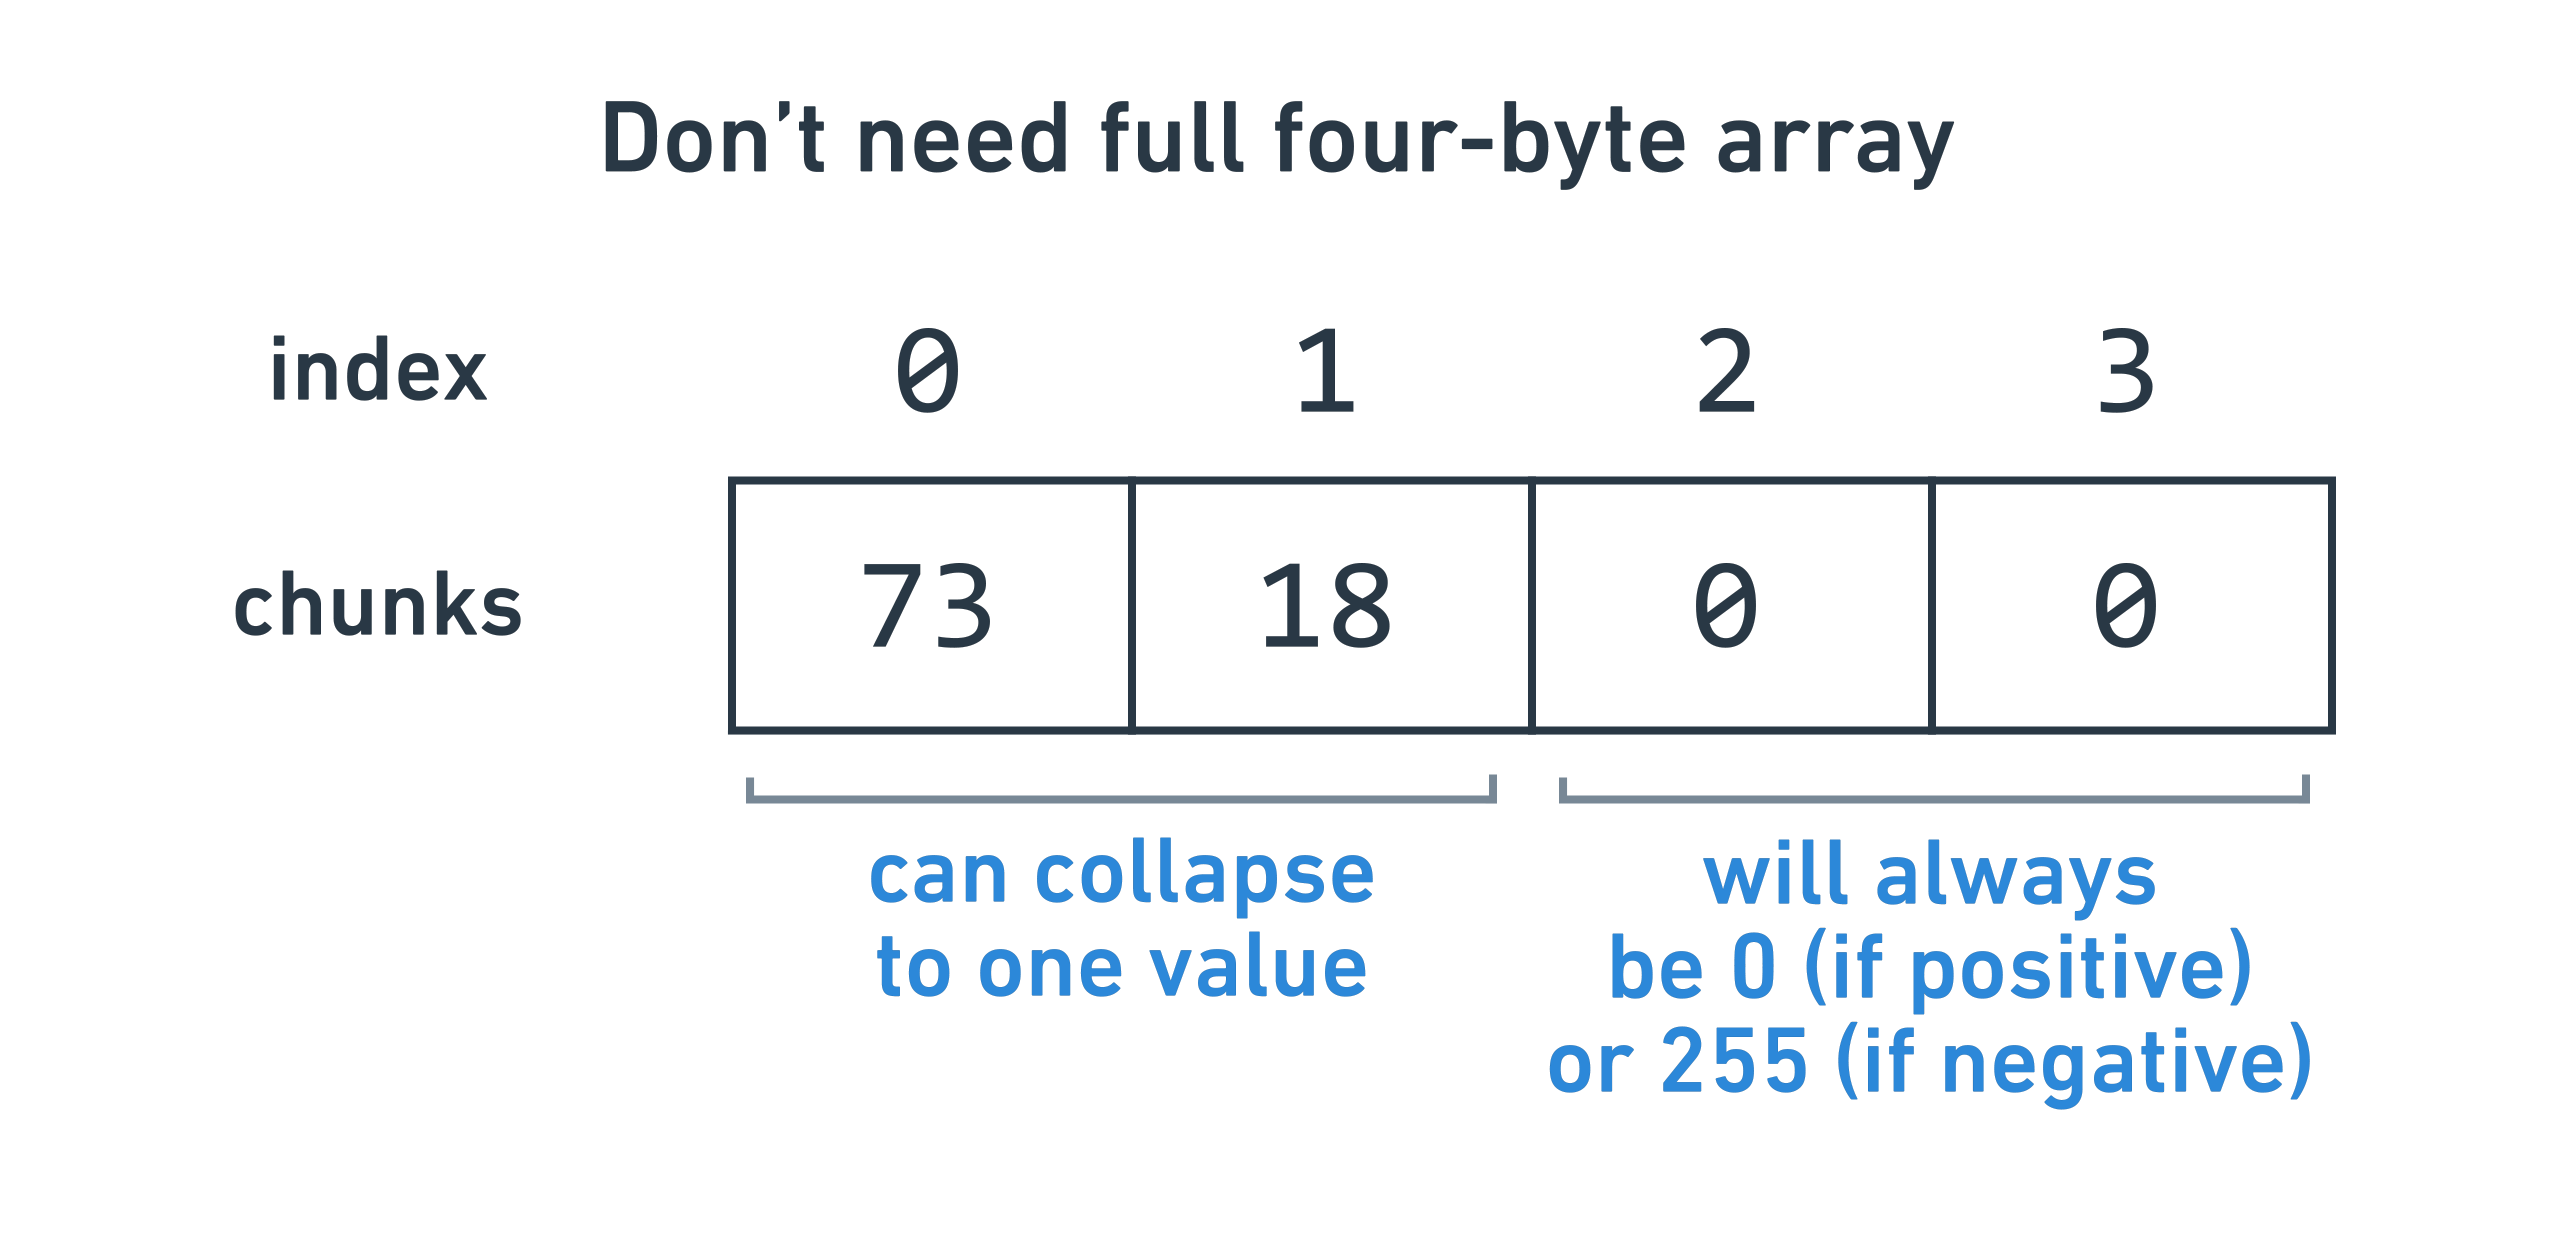
Therefore, I decided to use a native int to store the quantization error
rather than a full Number, saving a lot of memory. It’s just one slot per
pixel instead of six. Just like how fixed-point arithmetic maps a large range of
integer values to a smaller range of integer and decimal values (like 0-99999 to
0-999.99), we can map the range of an int, which is [-32768, 32767] to
[-1, 1], by dividing by 32,768.
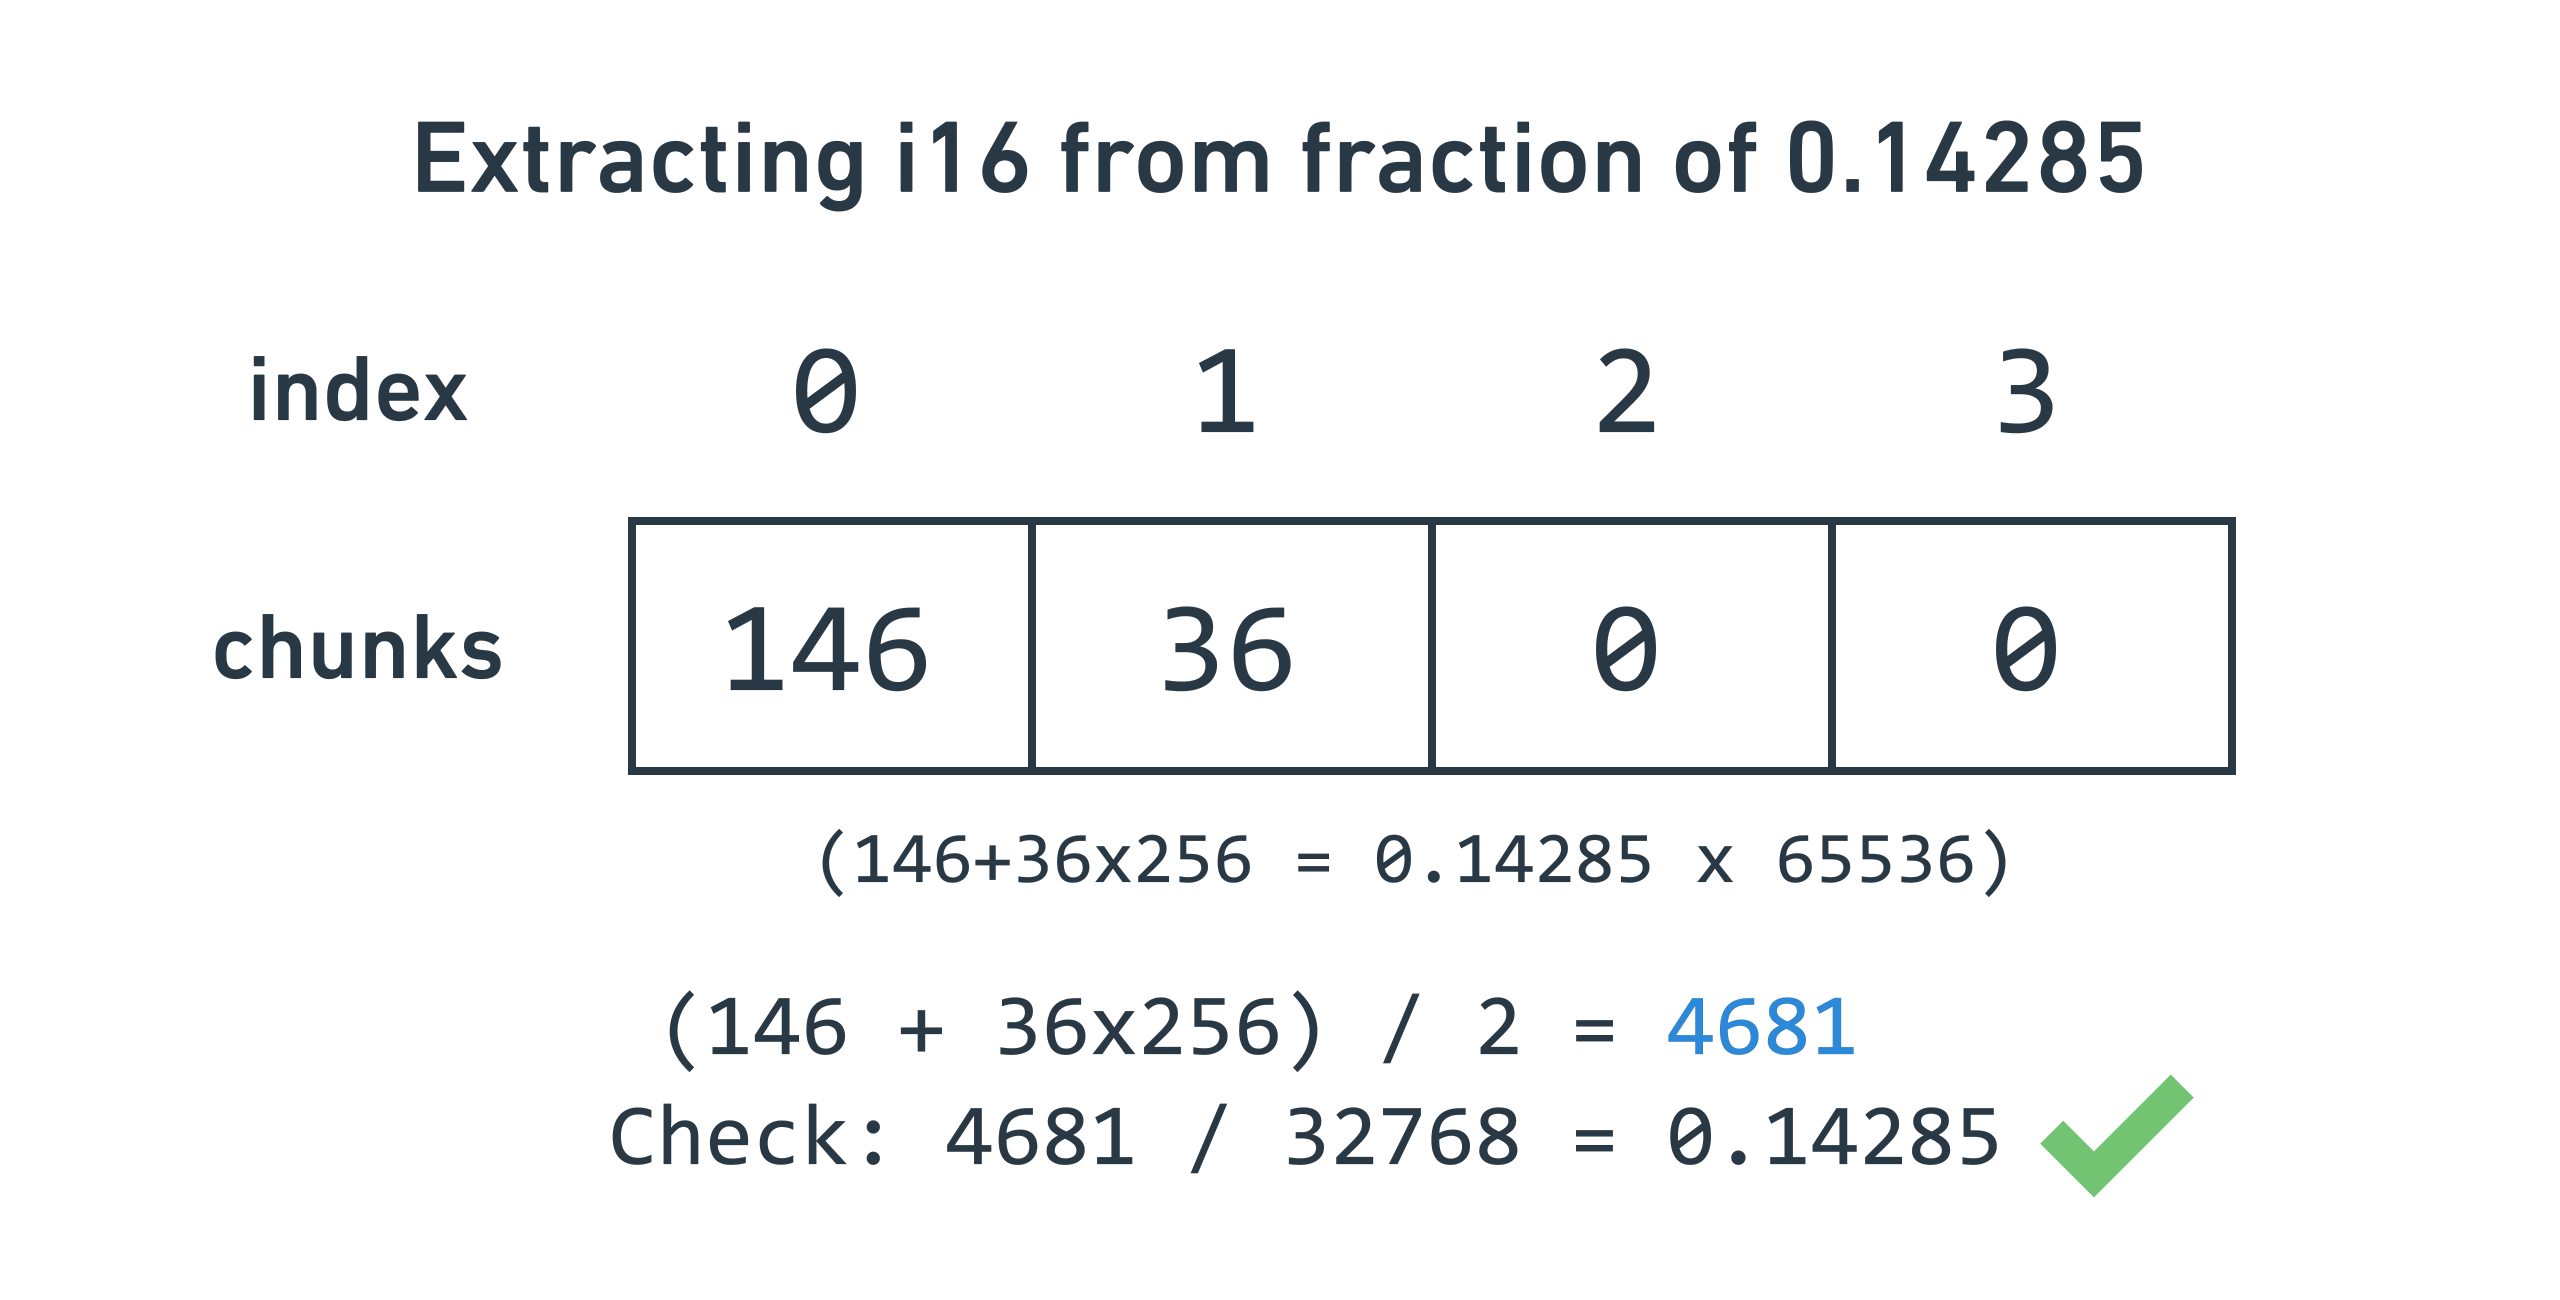
The first step to doing this is to write a Number method that extracts the
fractional part (the part after the decimal point, including the sign) and
outputs a int. In other words, it takes a Number, looks at the part after
the decimal point, and scales it up so it goes from -32768 to 32767.
class Number {
  method int frac_to_i16() {
    var Array parts;
    let parts = v.getParts();

    if (is_negative()) {
      return -((255 - parts[1]) * 128 + (256 - parts[0]) / 2);
    } else {
      return (parts[1] * 128) + (parts[0] / 2);
    }
  }
}
And then, to convert back, I wrote a new constructor method:
class Number {
  constructor Number new_from_int_frac(int i) {
    let allocs = allocs + 1;

    let v = Int32.new(i);
    // Need to multiply by two to map [-32768, 32767] to [-65536, 65535] range.
    do v.do_mul(two);

    return this;
  }
}
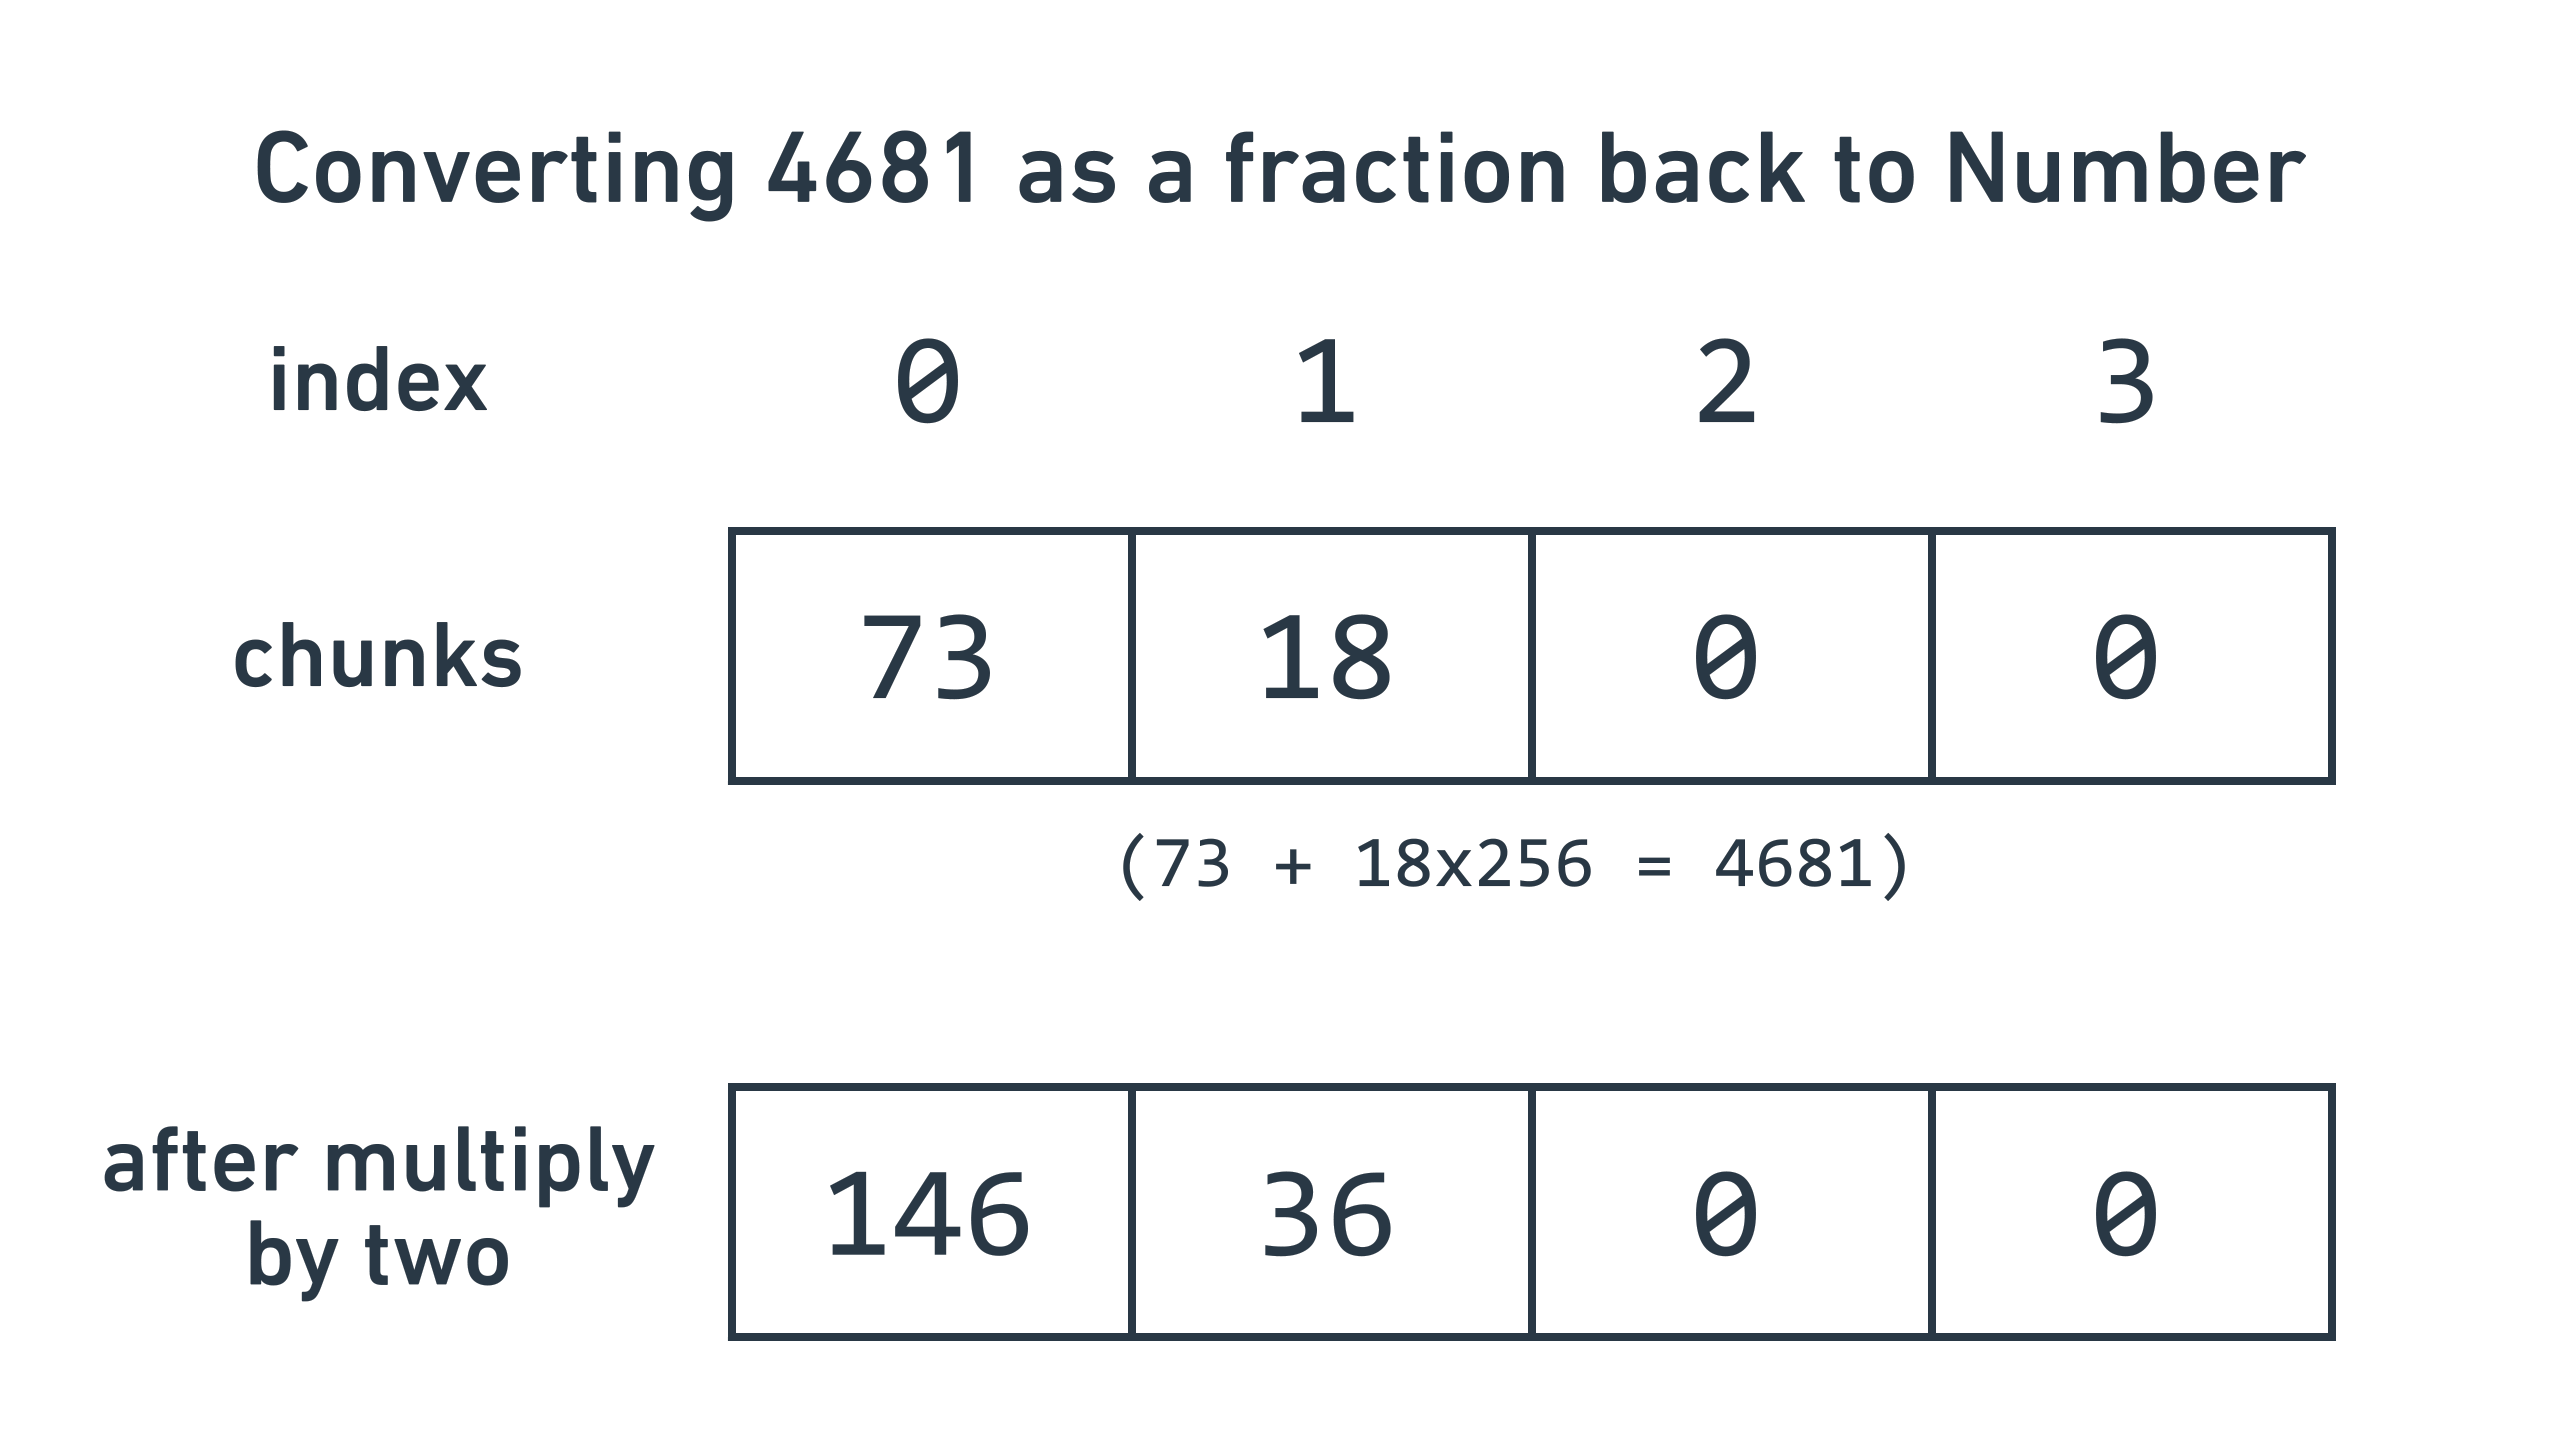
With these two, we can convert the quantization error into an int for storage,
and when we use it later, convert it back to a Number to do math on it. The
precision is 1 / 32768, which is half that of the 1 / 65536 offered by Number,
but the memory savings are huge (six times or more).
To demonstrate the change in Rust, we went from:
let dither_pixels: Vec<Number> = /* elided */;
let next_dither_pixels: Vec<Number> = /* elided */;
to:
let dither_pixels: Vec<i16> = /* elided */;
let next_dither_pixels: Vec<i16> = /* elided */;
Optimizing the raytracer
At long last, the raytracer started tracing the first row of the output, and
pixels started showing up without crashing! However, it took almost an hour to
get a single row of the output, which meant that it would take
256 rows * 1 hour/row = 256 hours = 11 days to finish the render. The last
hurdle was optimizing the raytracer enough so I could get a render in a
reasonable amount of time.
I wasn’t expecting the Jack raytracer to take seconds, or even minutes, but I was hoping it could be done within 24 hours. With all optimizations on, the Rust raytracer finished the entire render in 80 seconds, so if I could make the Rust raytracer run 10x faster, then maybe I could shave Jack’s 11 days down to 1 day.
To identify bottlenecks, I used the “pause-the-program” method. When you use Jack’s VM emulator to run the compiled code, you can hit stop at any moment to see what function is running. To do very basic profiling, which was all I could do with the tools available, you can do this a few times to see if there are any functions that seem popular. These are likely your bottlenecks.
90% of the times I paused, the program was in Number’s do_sqrt method.
That’s our first bottleneck!
Looking at the code, I saw some obvious places for optimization:
pub fn do_sqrt(&mut self) {
  let mut sqrt_s = SCALE_FACTOR.clone();
  sqrt_s.do_sqrt();

  let mut sqrt_sqrt_s = sqrt_s;
  sqrt_sqrt_s.do_sqrt();

  let mut sqrt_sqrt_sqrt_s = sqrt_sqrt_s;
  sqrt_sqrt_sqrt_s.do_sqrt();

  self.0.do_mul(&sqrt_sqrt_s);
  self.0.do_sqrt();
  self.0.do_mul(&sqrt_sqrt_sqrt_s);
  self.0.do_mul(&sqrt_sqrt_sqrt_s);
  self.0.do_mul(&sqrt_sqrt_sqrt_s);
}
I’m recalculating the scale factors on every square root, so every Number
square root incurs four Int32 square root calls. It’s easy enough to factor
those out to static constants:
static ref SCALE_FACTOR_SQRT_SQRT: Int32 = {
    let mut s = SCALE_FACTOR.clone();
    s.do_sqrt();
    s.do_sqrt();
    s
};

static ref SCALE_FACTOR_SQRT_SQRT_SQRT_POW_3: Int32 = {
    let mut s = SCALE_FACTOR.clone();
    s.do_sqrt();
    s.do_sqrt();
    s.do_sqrt();

    let t = s;

    s.do_mul(&t);
    s.do_mul(&t);

    s
};

pub fn do_sqrt(&mut self) {
    self.0.do_mul(&SCALE_FACTOR_SQRT_SQRT);
    self.0.do_sqrt();
    self.0.do_mul(&SCALE_FACTOR_SQRT_SQRT_SQRT_POW_3);
}
This provided an immediate speedup from 80s to 40s (2x). Woo!
The second bottleneck was Int32’s do_sqrt method:
let mut guess = Int32::from(5);
for _ in 0..20 {
    let mut inv = *self;
    inv.do_div(&guess);

    guess.do_add(&inv);
    guess.do_div(&Int32::from(2));
}
I suspected that running 20 iterations was wasteful since the guess may take fewer than 20 iterations to converge, so I added a short circuit if the old and new guesses are the same:
for _ in 0..20 {
    let mut inv = *self;
    inv.do_div(&guess);

    let mut new_guess = guess;
    new_guess.do_add(&inv);
    new_guess.do_div(&Int32::from(2));

    // Break if the old and new guesses are the same.
    if new_guess.cmp(&guess) == 0 {
        break;
    }

    guess = new_guess;
}
When I instrumented this, the average number of iterations went from 20 to 9.5, and the render time went from 40s to 35s (1.14x, cumulative 2.28x).
After this, I saw that do_mul and do_div were the new bottlenecks, so I
added some zero detection:
pub fn do_mul(&mut self, other: &Number) {
    // If either side is zero, don't even bother running the algorithm.
    if self.is_zero() || other.is_zero() {
        self.0.do_zero();
        return;
    }

    self.0.do_mul_right_shift_bytes(&other.0, 2);
}
The render time went from 35s to 31s (1.13x, cumulative 2.58x).
The final bottleneck was a surprising function: the right shift function. It made sense in retrospect, since it’s called 50+ times per multiply and divide.
fn arith_rightshift(x: i16, n: i16) -> i16 {
    let mut r = x;

    for _ in 0..n {
        let divided = r / 2;
        r = if r < 0 && divided * 2 != r {
            divided - 1
        } else {
            divided
        }
    }

    r
}
I won’t show all my optimizations step by step, but will instead list them out:
- Detect right shifting zero and short-circuit, because it’s a no-op.
- Split the logic into positive and negative cases. Positive is much simpler.
- Use
x & 1 == 0to detect evenness overx / 2 * 2 == x. - Short-circuit the negative case, because if
rever equals -1, any further shifts will not change this. - Convert the positive side to a table instead of dividing by 2 over and over.
After:
fn arith_rightshift(x: i16, n: i16) -> i16 {
    if x == 0 {
        return 0;
    }

    if n == 0 {
        return x;
    }

    let mut r = x;

    if x > 0 {
        let i = [ 1, 2, 4, 8, 16, 32, 64, 128, 256 ];
        r = r / i[usize::try_from(n).unwrap()];
    } else {
        for _ in 0..n {
            let divided = r / 2;
            r = if r & 1 == 0 {
                divided
            } else {
                divided - 1
            };
            if r == -1 {
                return r;
            }
        }
    }

    r
}
After stacking all of these optimizations back to back, render time went from 31s to 8s (3.9x, cumulative 10x). Hooray!
I implemented and tested each of these in Rust, then ported the optimization to Jack to see if the render time improved. It did get much faster, and ultimately I was able to render the final image in about 18 hours.
Finally, I’d like to point out that the Rust implementation using native f64
floats runs at 200x the speed of the Rust implementation with the Number
class, and that implementation in turn runs at 8000x the speed of the Jack
implementation. Hardware and compiler optimizations go a long way!
Parting thoughts
This was a uniquely fun project, especially because it was also my first personal Rust project. I hope this post shared some of the excitement, pitfalls, and learnings I picked up along the way. Thanks for reading! If you enjoyed this, please share with anyone interested, and check out my YouTube where I post lots of educational videos on software engineering.
You can find the Rust and Jack code here.